If you want a balloon arch stand that’s both stable and easy to customize, building it yourself is a smart choice. It gives you control over the shape and keeps your walls safe from tape damage, all while being budget-friendly.
By the end, you’ll know how to assemble a sturdy, professional-looking frame using simple materials like PVC pipe, a metal base, and sandbags.
Keep reading to see the step-by-step process.
Why a Stand Beats Taping to Walls
A stand beats taping to walls because it provides a stable, reusable framework that avoids wall damage and saves time. Unlike tape, which can peel paint or leave residue, a balloon arch stand keeps your surfaces intact and looking clean. It allows you to precisely position the frame, ensuring your color schemes and balloon sizes are perfect every time. The stand distributes weight evenly, making your arch more stable against wind or foot traffic. Additionally, assembling and disassembling the stand takes less time because you don’t need to measure or re-tape on unpredictable surfaces. This results in a professional-looking display that’s quick to set up and easy to repeat, eliminating the stress associated with wall-mounted options. For a similar performance-oriented tool, consider the best ring light with a stand that offers adjustable brightness and stable positioning for video work. For damage-free alternatives, you could instead use hanging methods that rely on hooks and clips designed to hold without marking walls. Choosing a stand with a solid base and sturdy poles also enhances overall stability during outdoor events, much like a high-quality fog machine relies on durable construction for consistent output.

6.6 FT HEIGHT: Standing at 6.6 feet tall, this arch provides ample space for stunning ceremony backdrops, floral arrangements, and balloon displays.Comes with a storage bag...
How to Choose Materials for Your Balloon Arch Frame
Use flexible PVC (1/2 inch diameter) for indoor balloon arches when you need smooth, curved shapes. Its flexibility makes it easy to bend into elegant arches without kinking, perfect for temporary decor. For outdoor setups, opt for thicker 3/4-inch Schedule 40 PVC pipe, which provides greater strength and resistance to wind and weather. Always match your fittings precisely to your pipe size to ensure stability and prevent wobbling. Secure indoor bases with plywood or heavy stands for added stability, and outdoors, ground stakes work well to keep everything in place. Avoid sharp edges on fittings and pipe ends to prevent balloons from tearing or snagging. Prioritize lightweight, portable materials that you can reuse for multiple events, maximizing your investment and minimizing cleanup. For wooden bases, use 3/4 inch ACX plywood with a smooth side for painting and a rougher side for stability. For those seeking design inspiration, reviewing the top Valentine’s Day Banner options can help you visualize complementary color schemes and themes. For crafting sturdy arrangements, floral foam blocks can anchor silk flowers inside the base for added decorative weight.

Size - Length of each: 17";The 1/2 inch Schedule 40 PVC pipe has an outer diameter of 0.84 inches and an inner diameter of 0.64 inches. This PVC pipe is suitable for various DIY projects.Please confirm before purchase.

Durable SCH40 Material: Made from heavy-duty PVC pipe with SCH40 wall thickness, with high plasticity, low temperature resistance, ultraviolet resistance, impact resistance and corrosion resistance, long service life

EXACT 1/2 INCH SIZE FOR A PERFECT REFIT: These white PVC pipe sections measure a true 1/2 inch nominal diameter, so they drop straight into the same fitting you are replacing with no guessing between inner and outer diameter.
How to Calculate Arch Height and Width for Your Stand
To calculate the length of your arch frame, start by measuring the height and width of your display space in inches. These dimensions directly influence the total length needed for your arch. For a wide, low arch, add the height and width together. When your height and width are similar, multiply the height by 1.5 and then add the width. For a tall, narrow arch, double the height and then add the width. Always convert your measurements to inches to keep everything consistent. Keep in mind that once your balloons are inflated, their fullness adds thickness to the arch, so recheck your measurements accordingly. Choosing your balloon colors early helps you visualize coverage and ensures a polished final look. Measure carefully and plan your frame size based on these precise numbers before cutting any PVC or gathering your balloons.
Building a Sturdy Base That Won’t Tip
Building a sturdy base that won’t tip starts with choosing the right materials. Use a metal base plate instead of plastic because it provides much stronger support for the arch. For larger arches, a heavy 25-pound plate is ideal, while a 10-pound base works for smaller setups. Never underestimate the importance of a solid foundation. Selecting the right pillow for your ring bearer follows a similar principle of prioritizing solid support to ensure stability. When comparing top-rated options, many buyers find that metal base plates offer the best long-term durability for any balloon arch. For those seeking quality and value, best yard signs with stakes also rely on durable materials to prevent warping or bending over time.
Focus on weight distribution by adding sandbags or water-filled weights at the corners of the base. This helps lower the center of gravity and reduces the risk of tipping over, especially in outdoor environments. A wider footprint, such as a 14 by 14-inch base, significantly enhances stability. Always position the stand on a flat, level surface to prevent wobbling. Before adding balloons, give the stand a gentle shake test; if it wobbles, add more weight to keep it secure.
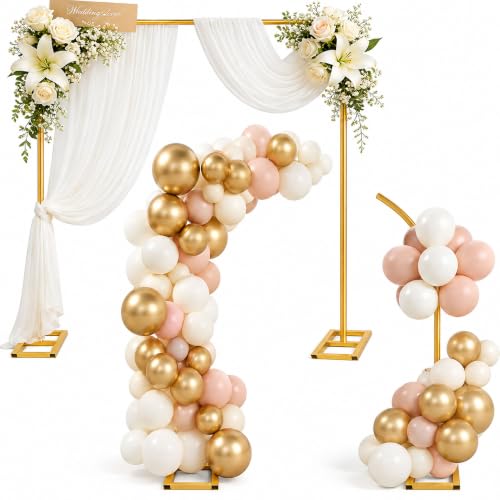
2-in-1 Square Backdrop Stand Adjustable -Multi-functional Gold Metal Stand. You can adjust the height and assembly method of the balloon arch stand to achieve a 6.6ft square balloon arch stand, a Half Arch Balloon Garland Stand, can be used as a wedding or party welcome sign stand.


【High-Quality Material】: The wedding arch frame is made of high-quality metal, strong and sturdy, and not easy to deform. Made by die-casting, polishing, spraying, and other processes. With anti-rust and corrosion-resistant functions, prolongs service life.
Assembling the Arch Frame Step by Step
Once the base is stable, start assembling the arch frame in manageable sections. Use flexible PVC pipe for indoor projects to achieve smooth, rounded curves. For outdoor setups requiring more support, metal conduit offers firmness. Connect each pipe segment securely by pushing joints together until they seat fully. If a joint feels loose, reinforce it with tape for added stability. The tension in the poles helps with easy assembly and maintains the arch shape, as poles are connected by aligning and securing sections with rubber bands and tape. Once the event concludes, the foil balloons used on the arch can be deflated and stored for future use, provided they were handled with care and not overfilled, ensuring reuse foil balloons safely. Shape the assembled pipes into an even curve, avoiding sharp angles that could weaken the structure. Ensure both ends are anchored firmly into your base before adding decorative elements. Check that each side of the frame matches in height and that the arch is centered over your display area. Confirm the curve provides enough space for balloon placement and that your material choices align with your color coordination plan. Last, inspect all joints for wobble; a stable, well-assembled frame is essential before proceeding to the next decoration steps. For a more refined finish, consider using decorative paper elements to wrap the poles, mimicking the look of professional party decor.

【COMPLETE PARTY PACKAGE】: Balloons arch kit package includes 15 folded glass fiber pole, 2 PVC Base, 2 PVC pipe, 2 water(sand) fillable bag, 1 manual pump, 50 balloon clips, 2 balloon knotter, 2 ground secure ropes, 4 ground nails. It will enough for all party decoration you need.

【Balancing Flexibility&Support】Our flexible flower pipe tubes are made of a highly elastic PVC and aluminum-plastic composite material, offering both exceptional flexibility and structural strength. The stems easily bend and hold their shape, and their multi-layered, thickened design prevents kinking and breakage. They retain their shape even under heavy loads, offering the perfect balance of flexibility and stability.

Durable & Thick Material (Upgraded Diameter) :Reinforced aluminum-plastic pipes (20mm recommended for arches) provide strong support.Thicker diameter ensures stability for large installations.Triple-layer protection (thickened plastic + aluminum core) enhances durability.
The Best Way to Attach Balloons for a Full Look
To achieve a full, professional look, start by using a balloon decorating strip as your base. Insert each balloon knot through the larger hole, then slide it into the smaller slot to lock it in place. Pack the balloons tightly on both sides of the strip to minimize visible gaps. Master proper balloon knot techniques to ensure each balloon stays secure. Use cluster arrangement strategies by forming two-balloon pairs, twisting them into quads, and adding groups of three to five balloons for an organic, natural shape. Stagger the sizes and positions of the clusters to avoid straight lines—rotate clusters and push some forward while pulling others back to create depth. Use glue dots or low-temperature glue on 5-inch filler balloons to hide seams and tuck them between clusters. For added fullness, integrate mini quart clusters with elastic bands as fillers. Frequently step back to assess your arrangement, adding extra balloons to areas that look thin. Keep knots hidden inside clusters for a clean, dense finish. Consider pairing your display with custom logo tablecloths for a cohesive branded event setup. For a unique twist, you might also incorporate an audio guest book to capture heartfelt messages from guests alongside the visual décor. For a classic bridal shower theme, you could draw inspiration from elegant drapery backdrops to frame the balloon arch beautifully.
Testing Your Arch for Wobble and Weak Joints
Start with a thorough shake test of your assembled frame before adding any balloons. Gently push it from different directions to identify loose connectors and balance issues. Check each joint’s stability by pressing on connectors, elbow fittings, and threaded ends; loose components tend to separate under gentle pressure. Pay close attention to your frame material—bent poles, cracked welds, or stripped threads are failure points that can cause instability. Stress-test weak spots where poles connect and inspect telescoping sections for worn locking mechanisms. Ensure your base sits flat and doesn’t rock—uneven footing can significantly increase wobbling. After adding a small section of balloons, repeat the shake test, as weight distribution shifts can pull the frame out of alignment. Keep testing and adjusting until the structure remains steady under pressure. Before proceeding, re-tighten or tape any joints showing movement to secure your frame fully. A weak joint can come undone during setup, so treat any faulty joint as a critical risk that requires reinforcement. For extra confidence, compare your frame’s stability against banner review standards that emphasize rigid base support and connector durability to catch issues early. Consider whether your arch’s lightweight frame could benefit from the same construction principles used in durable string lights, where weather-resistant connectors and stable hanging points prevent sagging and failure.
Three Anchoring Tricks for Outdoor Setups
To anchor a balloon arch securely outdoors, use a combination of stakes, ballast, and tension strategies. First, attach the arch to fixed structures like trees or lamp posts with fishing line. Keep the lines high to prevent tripping hazards and make the arch more stable against wind. Adding extra balloons along visible lines enhances color coordination and visibility. For added stability, use concrete pier blocks weighing approximately 36.7 lbs each as a base for the arch legs. You can also choose a design that matches the romantic color palette for a cohesive look.
Second, when stakes cannot be used, place ballast such as sandbags at the base of each arch leg. For calm weather, 20 to 25 pounds per leg suffices, but for moderate winds, increase to 30 to 40 pounds. Heavier loads provide better stability in breezy conditions. For indoor events, a fog machine creates a similar thick, low-lying effect, while a haze machine produces a more subtle, lasting atmosphere.
Third, drive ground stakes into the soil at an angle away from the arch for maximum grip. Auger-style anchors are ideal for loose or sandy ground because they screw into the soil more securely. Pair these with cross-tension straps that connect the arch to surrounding anchors, which helps distribute the load evenly. Matching your anchoring method to the surface conditions ensures that your outdoor decoration stays steady throughout your event.

Rich to Use: the quantity of water weight bags depends on your choice, a rich amount that can meet your use and replacement needs easily, also nice for sharing with others

Multifunctional square arch stand: You can install it as a balloon arch stand or balloon column stand, and you can adjust it to your desired height by adjusting the number of tubes

【Wind-Proof Stability in Minutes】 Comes with 2 heavy-duty bases and 8 water injection bags. Fill with water or sand to create a rock-solid, 12-hour wind-resistant foundation, ensuring your half arch stands tall indoors or out.
Common Mistakes That Wreck Your Balloon Arch Stand
Anchoring methods only work if your arch is built on solid ground, but even the best anchors can’t prevent collapse if you overlook the fundamentals. First, ensure your arch dimensions match the venue; a too-large arch can overwhelm a small room, causing headroom issues. Always count enough balloons to fill the frame—insufficient numbers lead to visible gaps that are hard to hide. Avoid thin PVC poles, as they tend to bend under load and compromise stability. Widen your base and incorporate cross-bracing to prevent tipping over. Never assemble your frame without tightening joints and locking connectors firmly in place. Before adding balloons, test the frame for wobbling and make adjustments as needed. Inflate balloons appropriately—overinflate only if your arch can handle the pressure; underinflate, and it will sag. Keep your balloon colors consistent to maintain a cohesive look, and ensure all balloons are evenly inflated to prevent a lopsided appearance. Place the arch on a flat surface, balance the weight distribution, and fill all visible gaps. Add decorative elements only after confirming the structural integrity of your arch. Always inspect every weak point before the event starts to avoid surprises.