Wondering how to wire your LED strip lights safely and effectively? With the right tools and a clear plan, you can set up your lights to shine brightly and evenly.
From measuring your route to making secure connections, I’ll walk you through everything you need to know to get your project done right.
Essential Tools and Components for LED Strip Wiring
Gather wire strippers, sharp cutters, a small screwdriver, pliers, and a soldering iron for permanent connections. Use solderless connectors for quick joins, such as those designed for 4-pin connectors for RGB strips, and L, T, or + style connectors for corners and branching points. Choose low-voltage cable, typically 18-22 AWG, to ensure safe and reliable power transmission. Always verify polarity, connecting V+ to V+, to prevent damage to your LED strips. Mount strips securely with aluminum channels to keep them aligned, protect them, and aid in heat dissipation. Seal the ends with caps to prevent dust and moisture ingress, and insulate splices with heat shrink tubing or electrical tape to ensure safety and durability. For layouts on circular surfaces, consider how round table options affect your routing path to minimize sharp bends. For outdoor or damp location use, repurpose the weather-resistant design of lantern lights by sealing all connections with silicone caulk for added protection. When testing your setup, a ring light with stand provides consistent illumination to clearly inspect solder joints and connector alignment before finalizing the installation.

SOLDERLESS AND EASY INSTALLATION: One end comes with a 4-inch pigtail, so you only need to insert the LED strip into the 2-pin LED light strip connector, check the polarity, and clamp it shut for a secure connection

Only for 8mm wide single color white led strips. Installation notes:1.Ensure metal in connector touches light strip; 2.Ensure the connection is correct with positive to positive.

NO SOLDERING REQUIRED & RELIABLE CONNECTION: The solderless design makes installation quick and hassle-free—just insert the light strip into the 2-pin LED strip connectors and tighten the screw terminal blocks using the included mini screwdriver. No soldering or additional special tools are required
How to Map Your Layout and Measure the Installation Area
To map your layout and measure the installation area accurately, start by sketching your route on paper or a floor plan. This helps you identify every run, turn, and endpoint before unboxing the strip. Measure each section carefully using a flexible tape, especially around curves, corners, alcoves, and obstacles. Include doorways, windows, and appliances in your measurements because they interrupt straight runs and affect the total length. Treat each 90-degree turn as a separate segment and label it clearly to avoid confusion later. This detailed diagram guides your choice of mounting methods, whether adhesive or clips, based on the surface type. Add a safety margin of 10% to 20% to your total length calculations to account for possible miscalculations. Remember, your layout influences the color temperature choice—longer, more complex runs with many bends may look best with a uniform color temperature to ensure consistent lighting. Double-check your added lengths against the strip’s cut intervals before finalizing your purchase and installation plan. Consider how foam boards used for professional backdrops provide a similar lightweight, rigid surface for mounting strips cleanly. Similarly, when reusing supplies like foil balloons, always incorporate a small safety margin for repeated use.
Why Matching Voltage and Polarity Matters
Matching voltage and polarity is crucial to ensure your LED strip functions correctly and safely. Your LED strip’s voltage rating must exactly match your power supply— a 12V strip requires a 12V power source, and a 24V strip needs a 24V power supply. Using a higher voltage can cause overheating and immediate burnout of the LEDs, while a lower voltage results in dim, flickering, or unstable lighting. This mismatch directly impacts color temperature accuracy and increases power consumption, compromising the look you aim to achieve.
Polarity is equally important because LEDs only conduct current in one direction. Reversing the positive and negative connections will prevent your strip from lighting and can damage controller boards or cause heat build-up. Always verify polarity with a multimeter before powering up. Typically, red wires indicate positive, and black wires indicate negative. Skipping this step risks causing smoke, sparks, or permanent component damage.
How to Choose Between Soldering and Connectors
Soldering generally provides a more reliable and durable connection than connectors for LED strip installations, especially when permanence and stability are priorities. Soldering reduces contact resistance and offers a solid electrical bond that is less likely to degrade over time. It is particularly advantageous for outdoor setups or high-current applications above 6A, where stable connection performance is crucial. Connectors, on the other hand, are designed for quick, tool-free installation, making them ideal for DIY projects or when frequent adjustments are needed. They allow fast field cuts and modifications without risking burnt pads or damaging the LED strip. However, connectors tend to introduce higher resistance at the join, which could impact performance in sensitive or high-power environments. When pairing LED strips with dimmable power supplies, soldering tends to yield cleaner, more consistent electrical contacts. For outdoor reliability, these wired connections pair well with weather-resistant curtain lights, which are designed to withstand exposure. For the best long-term results, choosing a setup with top fairy light trees ensures similar durability and performance standards across your installation. The choice ultimately depends on your project’s environment, the importance of long-term stability, and whether ease of installation outweighs the need for robust, permanent connections. For a completely different type of selection, choosing the best pillow for ring bearer involves comparing top options to find the right fit.

【UPGRADE SOLDERING IRON】The 100W soldering iron uses a high-power, advanced plug-in ceramic heating core that heats up quickly in 15 seconds, allowing you to work faster. Its temperature calibration function also ensures accurate and reliable temperature control. The pen-style iron is also portable and easy to carry.

COMPATIBLE LIGHTS: These connectors are designed solely for 2-pin 8mm width single-color COB LED strip lights,2835 3528 LED strip lights,NOT applicable to LED strip lights of other widths(5mm/10mm/12mm) and pin counts(3-pin/4-pin/5-pin/6-pin)

COMPATIBLE LIGHTS: These connectors are designed solely for PWM single-color COB strips with an 8mm width
How to Wire Multiple Strips: Parallel vs. Series
Parallel wiring is the best choice for connecting multiple LED strips. It ensures each strip has its own direct connection to the power supply, maintaining consistent voltage throughout. This prevents dimming or flickering at the ends of longer runs, keeping your lighting effects uniform. To do this, connect each strip’s positive and negative wires directly to the power supply’s corresponding outputs, using matching wiring colors for clarity. Make sure your power supply can provide enough current for all the strips combined, but this setup guarantees even brightness across all connected strips. For consistent performance across larger installations, selecting a reliable high-output pump ensures your power source can handle the total load without voltage sag. You can make your own paper flower garland using similar parallel wiring techniques to ensure each decorative light stays equally bright. For example, keeping petals fresh requires avoiding voltage drops just as LED strips do.
In contrast, series wiring creates a single loop where the voltage drops with each connected strip. This results in reduced brightness on downstream strips and can spoil your lighting effects. Since standard LED strips require a constant voltage supply, series connections should be avoided because they cause uneven lighting or potential failure. For most projects, parallel wiring offers a reliable and straightforward way to keep every LED strip bright and consistent.
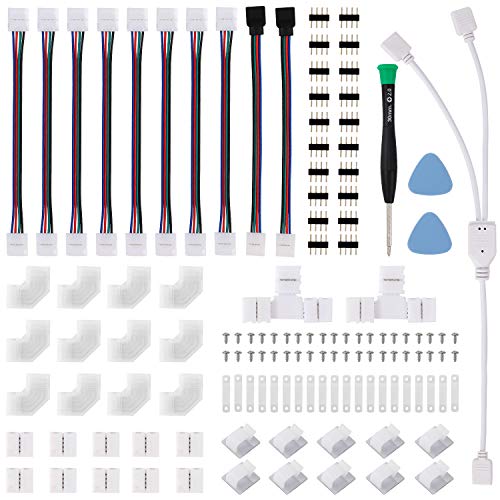
💙Upgraded Connectors & Clips - We upgraded the L shape connectors from normal to solid and unbroken ones for different corners. And the mounting clips are also upgraded to two-end frosted styles, which is strong and good looking.
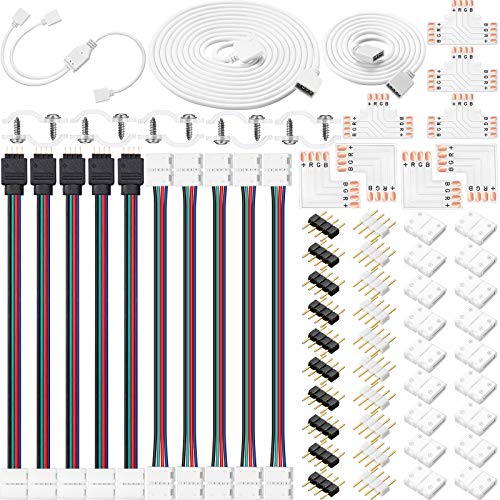
LED strip connector kit: the package includes 5 pieces female connector wire cables, 5 pieces LED connector cables, 10 piece fixing clips, 10 pieces screws, 10 pieces black male to male connectors, 10 pieces white male to male connectors, extension cable in 3.3 feet and 6.6 feet, 1 piece of 2 way separator, 20 pieces solderless gapless connectors, 4 pieces L-shaped connectors and 4 pieces T-shaped connectors, which can meet your DIY need

Working condition: our LED light strip connectors are able to stand up to 4 ampere current and 0 - 24V (5V, 12V, 24V) voltage, the heat resistance level is -20℃ - 100℃, so they are suitable for most non-waterproof 4 pin SMD 5050 RGB lights in 0.39 inch/ 10 mm width, and you should pay attention to use them correctly for ensuring safety and extending service life
How to Prevent Voltage Drop on Long Strip Runs
To prevent voltage drop on long strip runs, you should divide the total length into shorter, independently powered sections. Voltage drop occurs because the copper traces in the LED strip resist current flow, causing a gradual decrease in voltage from the power source to the far end. Running the strip within recommended limits is crucial: about 5 meters for 12V strips and 8 to 10 meters for 24V strips. Using thicker feeder wire, such as 12 to 14 AWG, significantly reduces resistance, helping maintain consistent voltage across the entire length. Just as using higher-rated ropes ensures consistent performance under load, choosing the right wire gauge and power strategy is equally critical for LED longevity. For folding chair events, selecting a durable polyester chair cover can protect against spills and wear. Parallel wiring—where power feeds from multiple points—can help keep voltage stable, but dividing long runs into shorter segments with their own power supplies offers the most reliable solution. Always verify the voltage at the farthest point with a multimeter to ensure it stays within 3% of your target voltage, maintaining uniform brightness and color consistency. Proper heat dissipation also improves performance but is secondary to dividing long runs effectively. For larger events where consistent performance matters, consider using an audio guest book to capture memories without any voltage concerns.

【Compatible Lights】This installation accessories set is ONLY compatible with 8mm width 2-pin COB LED Strip lights(Not applicable to 5mm/10mm/12mm board width and PAUTIX CCT Tunable COB LED Strip Lights).

【Compatible】This mounting kit is only suitable for PAUTIX 12mm 3-pin RGB Smart IC COB LED strip lights (not compatible with 3mm/5mm/8mm/10mm and other COB LED strip lights). Not compatible with strip lights such as 2-pin/4-pin/5-pin/6-pin. Note: Not applicable to PAUTIX 4-pin RGB COB LED

Great for 12V LED Lighting Projects: 66FT red and black 2-conductor wire is ideal for extending power connections for LED strip lights, cabinet lights, RV interior lights, dome lights, accent lights and other low voltage DIY lighting projects.
Where to Inject Extra Power for Long Strips
Inject extra power at the midpoint of your long LED strip whenever possible. This is the most effective spot to ensure uniform brightness, as it reduces the distance current must travel through the copper wiring to both halves of the strip. If midpoint access isn’t feasible, feed power from both ends to share the load evenly. For very long or high-current strips, combining both midpoint and end injections provides optimal brightness and prevents dimming sections. Plan your injection points based on voltage, strip density, and length: for 12V strips, inject every 2.5 to 5 meters; for 24V strips, every 5 to 10 meters. Tighter spacing is necessary for higher wattage models to maintain consistent brightness across the entire length. If you split a long run into segments, add injection points at each boundary to keep everything evenly lit.

【Tunable Color Temperature】DC24V 16.4FT Tunable FCOB CCT LED strip, Warm White 3000K to Cool White 6000K,With the newly upgraded 17Keys RF Remote, you can choose different color temperature and brightness according to your needs.One strip of light can realize dual lighting effects.

Superior Performance: Each module has 4LEDs, total 10 modules. Bright LED light source emit cold white light, will light up your whole van.
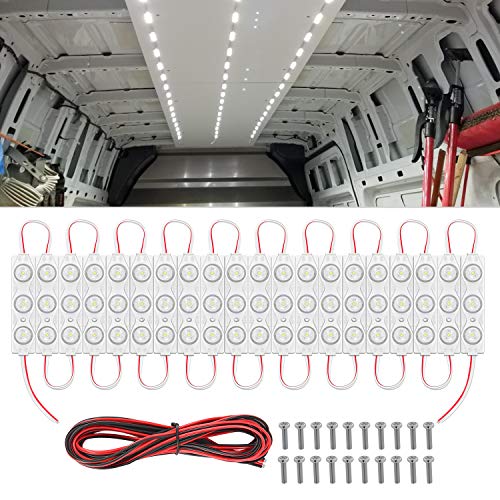
Superior Performance: The Van Interior Light Kits for the van contains 20 modules. Each module consists of 3 leds lamp 1.2W, using high-quality 2835 LED chips. Bright LED light source emit cold white light, will light up your whole van. Combined with high-quality lenses and 120° wide-angle illumination, this lamp module can provide a comfortable and bright lighting environment for your vehicle.
Safety Checks Before Powering On Your LED Strips
Before powering up your LED strip, thorough safety verification is essential. Start by isolating power completely—disconnect the mains or unplug the power supply to ensure no electricity flows through the circuit. Never touch any connections while the system is live. Check that your strip’s voltage matches your power supply’s output—most commonly 12V or 24V—to prevent electrical stress or failure. Confirm correct polarity; reversing positive and negative can cause permanent damage. Calculate the total wattage based on your strip length and verify that your power supply offers a safety margin—preferably 20 to 30 percent above your total load—rather than just matching it exactly. For extra protection, install a fuse on the secondary side of the power supply. Inspect all wiring for exposed conductors, frayed wires, or damage; use heat-shrink tubing or electrical tape to ensure insulation is solid. When ready to energize, spread the strip out fully instead of powering it while still on the reel to avoid heat buildup that could damage the LEDs or wiring. Make sure the mounting surface is clean and allows airflow to prevent overheating. Additionally, consider the best fairy lights used in mason jars for a similar decorative approach that prioritizes safe, low-voltage operation. Lastly, verify that your chosen color temperature aligns with your desired ambiance, then restore power only after all safety checks have been completed successfully.
Common Wiring Mistakes That Kill LED Strip Lights
Reversed polarity is the most common wiring mistake that kills LED strip lights. Swap the positive (+) and negative (−) connections at any point, and your strip simply won’t light. Always double-check that each (+) label matches the positive terminal and each (−) label matches the negative terminal. Ensuring proper polarity is critical because LED strips are polarity-sensitive; incorrect wiring can cause immediate damage or prevent operation altogether. Use a multimeter to verify voltage and polarity before powering up, especially when working with longer runs or multiple connections. This simple step can save you from costly replacements and troubleshooting. To prevent the strip from detaching, also consider using a high-quality double-sided tape for secure mounting. As with fragile foil balloons, careful handling and incremental pressure release can prevent sudden failure when connecting or disconnecting wiring. If the strip still fails after correct wiring, inspect the connection points for physical damage that can mimic the symptoms of a polarity issue, similar to how a crushed petal can ruin the illusion of a realistic artificial rose.