Have you ever wondered how stage lighting can instantly change the mood or focus of a space? LED PAR can lights are a popular choice because they offer precise, controllable lighting that can be customized on the fly.
They’re energy-efficient, emit far less heat, and make switching colors or effects quick and easy.
Keep reading to learn how to choose the right beam angles and color options for your setup.
What LED PAR Can Lights Actually Do
LED PAR can lights provide a controlled, directional beam perfect for area, accent, and wash lighting. They offer precise color blending through RGB or RGBW systems, allowing you to create saturated hues that set the mood and atmosphere. Use them to highlight performers or scenery, or diffuse light softly across walls and ceilings for gentle color effects. Their ability to cover large areas evenly makes them ideal for lighting big spaces. Adjustable beam angles enable a quick switch from tight spotlights to broad washes, giving you flexibility in your setup. For live performances or clubs, you can trigger pulsing, fading, or synchronized effects to enhance the visual experience. Additionally, their compact design reduces heat output and allows silent operation, making them suitable for any venue. For product or portrait shoots, they can serve as a ring light alternative for even soft illumination. When paired with a top fog machine, the beam becomes visible, creating dramatic volumetric light effects in the air. For a DIY project, these lights can be mounted on a custom arch backdrop stand to evenly illuminate the structure.
LED vs. Halogen PAR Cans: When to Switch
Switching from halogen to LED PAR cans makes sense when you want to cut down on power consumption, heat output, and maintenance. LED units use up to 90% less electricity, which can significantly lower your energy bills and ease the load on your circuits or generators. They also generate minimal heat, reducing burn risks and cooling costs—an important advantage in small venues. With lifespans ranging from 25,000 to 50,000 hours, LEDs last far longer than halogen bulbs, which typically last only 1,000 to 2,000 hours. This means fewer lamp changes and less hassle over time. Additionally, built-in DMX control in LED fixtures allows you to change colors electronically, eliminating the need for gels and making dynamic lighting shifts easier and quicker. However, if you need the warm tungsten glow or require specific beam shapes that match your existing setup precisely, halogen can still hold value. Overall, switch when reducing power use, heat, maintenance, and gaining smarter control are your priorities. Beyond venue logistics, choosing the right pillow for your presentation can also impact the overall aesthetic, so consider matching the fixture’s finish to your event’s theme. For instance, you might use hooks and clips to mount lightweight LED fixtures without a stand, preserving the clean look of your setup. Additionally, opting for modern party favors that are not junk can extend the thoughtful design of your event beyond the lighting.

Exceptional Brightness at an Equivalent Price - 60 RGB LEDs per light delivers consumers level that customers consistently praise as "very bright for the cost." Perfect entry-level stage lighting that rivals expensive alternatives.

SUPERIOR QUALITY & PERFECT CONSTRUCTION:High quality is a standout feature of this LED stage light. Crafted with an aluminum-iron alloy casing, it boasts strong heat dissipation. It comes with advantages such as low power consumption, high energy efficiency, stable light source output, and durability.Long Working Life and Exquisite Appearance - This Wash lights have a sturdy and exquisite appearance. , built-in cooling fan for extended life. Long Lifespan LEDs could be up to more than 60,000 hours.
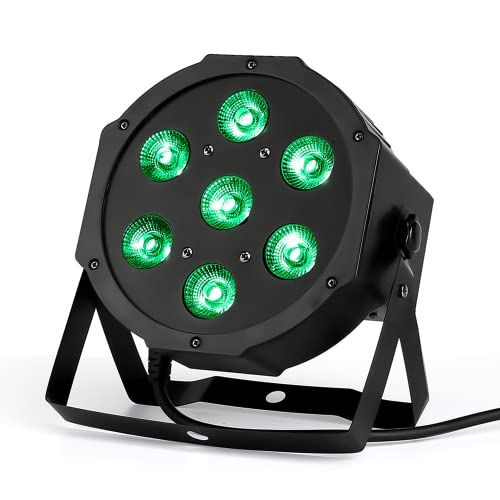
♬LED MODES AND COLORS:♬ There are 6 modes including DMX512, Master/Slave,Sound Active,Work Auto, Strobing Static Color,Color Changing and Color Fade suitable for a variety of scenarios. The bright par light is built with 4in1 RGBW creating multiple color effects. In addition,the stage lighting speed could adjust as your request.
How to Match Beam Angle to Your Venue Size
To match your beam angle to your venue size, start by measuring your throw distance—the distance from the fixture to the surface or area you want to illuminate—and determine your target coverage area. For small venues up to 20 feet wide, choose a wider beam angle around 60° to ensure even coverage and prevent harsh hot spots caused by short throws. Medium spaces between 20 and 40 feet benefit from beam angles of 25° to 40°, providing a balanced wash without over-spreading. For larger venues exceeding 40 feet in width, opt for narrower angles such as 15° for focused, high-intensity highlights or 45° to 60° for broader ambient lighting. Keep in mind that faster angles—those narrower than 20°—double the beam diameter at a given distance, which can lead to over-spreading if not carefully matched. Using a beam-angle calculator can help you precisely match your fixture’s beam angle to your throw distance and venue size, ensuring optimal coverage and illumination quality. For optimal visual impact, a professional effect can be achieved by using dry ice fog machines to diffuse the light beams and enhance visibility. For example, just as reusing foil balloons requires careful attention to material integrity and safety to avoid failure, matching beam angles demands precise measurement to prevent lighting inefficiencies. For a neat finish, consider gathering natural materials like fresh flowers and greenery to create a balanced garland design.

FULLY MANUAL ADJUSTABLE BEAM ANGLE FROM NARROW TO WIDE BEAM (5°-60°)

LSPAR20B-ZOOM features 4000K, 10W, Dimmable zoom angle adjustment of 15~60 degrees (allowing different beam spread)

Energy efficient 6.5 watt PAR20 LED replaces 50 watt incandescent and 11 watt fluorescent bulbs while producing 520 lumens of bright 3500K neutral white light.
Why RGB, RGBW, and UV Color Modes Matter
Choosing the right color mode is essential because it directly influences your lighting’s visual impact. RGB mode provides bold and saturated colors through blending, making it ideal for dynamic stage effects. However, its lack of a dedicated white channel results in less accurate or softer whites, which can be a drawback for venues needing natural skin tones or pastel shades. RGBW mode addresses this by adding a white chip, delivering cleaner pastel hues and more precise skin tones, making it suitable for mixed-use spaces that require both vibrant colors and functional white light. UV mode, on the other hand, activates blacklight effects, causing fluorescent materials to glow and creating striking visual contrasts — particularly useful for themed shows or nightclub settings. While programming with RGB mode is straightforward and cost-effective, RGBW offers greater versatility with the ability to produce vivid colors and pure white light without compromise. UV mode tends to work best as a specialty effect to highlight specific elements rather than as a primary lighting choice. If your priority is budget-friendly color impact, RGB mode suffices. For a balance of vibrant colors and white light capability, RGBW is the better option. For high-contrast, reactive visuals that emphasize ultraviolet effects, UV mode delivers the best results. When considering your overall event setup, choosing the perfect banner ensures your signage matches the visual impact of your lighting. For events using decorative elements like confetti, static buildup can interfere with balloon adhesion, so grounding techniques are essential. Achieving a professional-looking result with lighting also relies on the same attention to detail used when crafting a DIY graduation backdrop.

LED Stage Lights: 54‑watt stage lights with 54 independent LED diodes (12 red, 18 green, 18 blue, 6 white) for rich RGBW color mixing. Enjoy a long lifespan of over 50,000 hours, complemented by a wireless remote control for seamless operation.

[Brighter & Colorful]: This 25W Stage Lights are made of high quality imported RGBW LED beads, which are brighter, more purer colors and lower power consumption. With vibrant colors and smooth color mixing effects, this led par light have will impress you and add sparkle to any party

【Dynamic RGBW Color Mixing for Every Occasion】Powered by 18x4W RGBW 4IN1 LEDs, this par light delivers an extensive range of vibrant colors and striking effects. Whether for events, installations, or stage productions, it ensures captivating visuals that elevate any occasion.
Top 5 Venues That Benefit Most From LED PAR Cans
LED PAR cans are especially beneficial in nightclubs. Their strong color output helps create an immersive ambient atmosphere, perfect for lively dance floors. Because they run cool, they can handle crowded spaces without overheating, maintaining comfort for patrons and preventing fixture failures. The quiet operation also prevents noise distractions, keeping the focus on music and lighting effects. For additional bedroom ambiance, flexible rope lights can be used to complement the effects from PAR cans. A stunning parade display, for example, also relies on top parade banner choices to make a visual impact alongside such lighting. Over time, their energy efficiency and low heat output reduce operational costs, making them a reliable choice for high-traffic environments that rely on vibrant, dynamic lighting. Regular maintenance with the best grommets ensures secure cable management and durability for these fixtures in demanding club settings.
What to Check Before You Buy LED PAR Cans
Before purchasing LED PAR cans, focus on their light output measured in lumens or lux rather than wattage alone. Lumens indicate the actual brightness the fixture produces, helping you match it to your venue’s size, throw distance, and mounting height. For example, a small stage or intimate space might require around 1,000 to 3,000 lumens, while larger venues may need fixtures providing 5,000 lumens or more. Confirm the beam angle and optics too. Narrow beam angles, typically between 10 and 20 degrees, are ideal for focused accents, whereas wider angles—such as 40 to 60 degrees—are better suited for broad wash effects. For creating a clean and professional lighting background, consider using foam board panels as a lightweight backdrop material to diffuse or reflect light evenly.
Next, examine the color quality by checking the CRI (Color Rendering Index). A CRI of 85 or higher generally ensures whites and other colors appear natural and accurate. Verify the LED type—select RGBW for mixing red, green, blue, and white for vibrant color options, or COB (Chip on Board) LEDs for a more uniform, high-intensity beam. Consider smart controls, ensuring the fixture supports DMX protocols, offers multiple channel modes, and is compatible with wireless or RDM (Remote Device Management) systems, which streamline operation and programming.
Assess the mounting options available—confirm that the hardware suits your setup, take note of the fixture’s weight for stability, and check the IP (Ingress Protection) rating to match environmental conditions. For outdoor or damp environments, an IP rating of 65 or higher is recommended. Review thermal management features such as heat sinks or fanless designs to ensure longevity and consistent performance. Lastly, do not overlook warranty details, which can save you costs on repairs or replacements down the line. Covering these points helps you avoid mismatched fixtures and unnecessary expenses. For applications involving supporting silk flowers, consider whether floral foam density matches your display requirements.
Why LED PARs Slash Your Electric Bill and Cooling Load
LED PARs generate less waste heat because they use significantly less electricity overall. Since each watt of power consumed by traditional lighting converts into heat, reducing power use directly lowers heat output. With less heat being produced, your HVAC system doesn’t have to work as hard to maintain a comfortable temperature. This reduction in thermal load can decrease your cooling energy needs by up to 18% annually. As a result, you benefit from lower lighting costs and reduced cooling bills, making LED PARs a financially smart choice for any air-conditioned space.
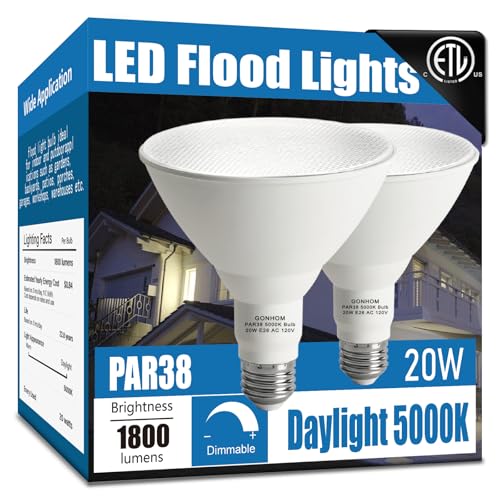
Energy Saving: Par38 LED flood light outdoor bulb use only 20W, equivalent to 200 watt LED bulbs, enjoy 1800 LM daylight lighting saving up to 85% electricity bill.
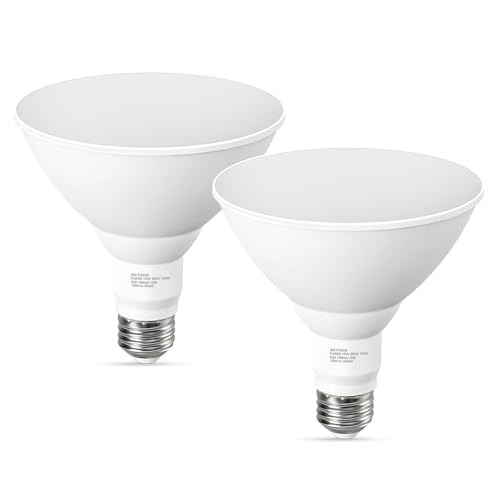
Ultra bright 5000K daylight for clear visibility: experience vibrant daylight with 5000K color temperature that mimics natural sunlight. Pperfect for outdoor areas like driveways, security lighting, garages, and warehouses.

BRIGHTER LIGHTING - Energy efficient high quality LED light for high ceilings, larger spaces or situations where you simply want more light. Enhance bulbs feature higher Color Rendering Index (CRI) than standard LED light bulbs which measures a bulb’s ability to make colors look vibrant and natural, just the way they should. This bulb’s color temperature is 3000K with a more energizing light. This is a great dependable general purpose recessed and outdoor security lighting bulb.
3 Common Beam Placement Errors and How to Fix Them
To avoid beam placement errors, focus on maintaining the correct overlap between fixtures. Aim for a 30% to 50% overlap to ensure even coverage without dark seams or hotspots. If you notice dark seams appearing between fixtures, increase the overlap or widen your beam angles to fill gaps. Conversely, excessive overlap causes bright hotspots and dual shadows, indicating overconcentration. To fix this, spread your fixtures farther apart or reduce their tilt convergence. Lastly, matching your beam angle to your throw distance is crucial; use the formula 2 times the tangent of half the beam angle multiplied by the distance to calculate the beam diameter. Adjust your fixture placement and angles until the coverage appears seamless, and always test in the actual space to catch issues that might not be obvious from calculations alone. For event lighting, fairy lights can also be used to create a softer, ambient glow that complements the primary fixtures. Before finalizing, always solder LED strip lights securely to prevent loose connections that could cause flickering or uneven power distribution.