Wondering how to create a beautiful wedding arch without breaking the bank? You can craft a stunning floral backdrop using simple materials and a few key steps.
With just a basic frame, fresh flowers, and some greenery, you’ll be able to make an elegant arch that looks professionally done.
Keep reading to see exactly how to bring your vision to life.
Choose a Flower Arch Frame That Fits Your Budget and Style
Choosing a flower arch frame that matches your budget and style is essential. The material of the frame significantly influences both the cost and the look. For a rustic or boho theme, building a wooden arch costs between $80 and $150, making it an affordable and customizable option. Metal frames offer a lightweight yet sturdy choice, with DIY options available for under $150—ideal if you want a modern, sleek appearance. Acrylic frames provide a minimalist, floating floral effect but tend to be more fragile and may cost more depending on size and thickness. For a similar effect in photography, investing in a quality ring light can ensure even, flattering illumination for your decor setup shots. If the arch is intended for a ceremony, consider pairing it with a unity candle to create a cohesive and symbolic focal point. To ensure reliable operation during setup, remember that top fog machines prioritize consistent output for performance events.
Budget considerations are key: renting a bare arch typically costs between $200 and $500, which reduces upfront expenses but might limit customization. If you’re handy, constructing your own metal frame is a cost-effective alternative, especially for smaller or simpler designs. Remember, heavier frames like wood can be more difficult to transport, so consider your venue’s accessibility. Matching the shape of the frame to your venue’s space ensures easier setup and more harmonious decor later on. A simple, versatile frame can be reused or repurposed for future events, providing additional savings.

【Excellent Quality】: Our wood wedding arch is made of high-quality solid wood with a unique wooden texture. The surface has been carefully ground and fired, which make...
Prep and Hydrate Your Flowers for a Longer Display
To prep and hydrate your flowers for a longer display, start by recutting each stem at a 45-degree angle and trimming 1 to 2 inches. This reopens the water-conducting tissue, helping your flowers absorb water more effectively. Use sharp shears to avoid crushing the stems, and cut underwater to minimize air bubbles that can block water flow. Remove all foliage below the waterline to prevent rot and bacterial growth that can shorten the flowers’ lifespan. Place the prepared stems in clean buckets filled with fresh water and floral preservative to keep them sanitary. Allow them to hydrate for 4 to 12 hours, or overnight for optimal recovery. Store the flowers in a cool, dark spot away from drafts to maintain their firmness and freshness until you’re ready to arrange them on your arch. For large setups, consider using a professional balloon pump to quickly inflate decorative elements for your arch.
Build the Arch Base and Attach Floral Mechanics
Start by securing your arch base to create a sturdy foundation before attaching floral mechanics. Stake it firmly outdoors to resist wind or use weighted bases indoors to prevent tipping. For rental setups, zip ties are your go-to—they fasten foam cages, chicken wire, or moss mechanics directly to the frame. Tighten them enough to hold the weight but avoid distorting the structure. Build from the bottom up, placing foam blocks along the arch for balanced weight distribution. This stable base also supports your lighting design, allowing you to attach lights securely without sagging. For a tidy display, maintain consistent drape spacing to ensure the fabric hangs evenly. Cover any sharp wire ends for safety. Pre-install zip ties on cages by snapping off ties, threading through cage sides, and wrapping with waterproof tape to streamline onsite assembly. Once the base is secured and reinforced, you’re ready to attach greenery and blooms confidently. Consider choosing a best wood arch with a simple rectangular or curved design to simplify attaching floral mechanics and ensure even weight distribution. As a final touch, adding small token gifts to the arch base can serve as unique party favors for guests to take home.

Upgraded 2.0: 5-Layer thickened material, reinforced edging & enlarged fill port. Even if a 50kg girl stands on it, the weights for arch stand won't break. High-frequency thermal sealing delivers exceptional airtightness, reliable quality and long life

Ultra-Durable Construction: Upgraded 5-layer thickened balloon arch weights feature reinforced edges & enlarged fill ports. Withstands 50kg pressure without rupture. High-frequency thermal sealing ensures premium airtightness for long-term use as balloon arch weight bags

🔶 Heavy-Duty PVC Construction - grade PVC with high-frequency heat-sealing technology ensures 100% leakproof performance. Reinforced seams withstand 50+ reuse cycles - lasts 3X longer than standard plastic bags. Rustproof golden plating maintains elegance in outdoor weddings/events
Add Greenery First, Then Focal Flowers (Step by Step)
Start by building your foundation with greenery before adding focal flowers. Place greenery strategically where you want volume, leaving intentional gaps for your flowers to stand out. Use varying stem lengths, with shorter pieces on the outside and longer ones towards the center, to create depth and a natural drape. Italian Ruscus or Smilax vine work particularly well for this step, providing a lush, textured backdrop. For a lasting shine, choose battery-operated options that offer consistent illumination without the need for a nearby outlet. This approach ensures your design has a solid structure and a balanced, organic appearance before introducing the bold focal blooms. For a touch of ambient sparkle, you can weave in fairy light trees similar to those reviewed for quality and value in a top comparison guide. For a festive alternative, consider using red lanterns as a bold, non-floral accent that adds celebratory color and cultural significance to your arch.
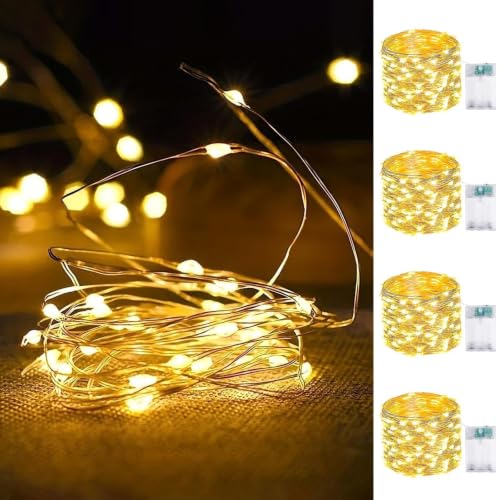
4-Pack Fairy Lights Battery Operated: Get 4 separate 16-ft strands of string lights, each featuring 50 ultra-bright LEDs, in one pack — enough to wrap a headboard, decorate centerpieces and wreaths, drape over mantels, or line an entire balcony. Each strand is powered by 3 AA batteries (not included), so you can place them anywhere without hunting for an outlet.

Battery Operated String Lights: Powered by 3*AA battery (batteries NOT included). The battery box is not waterproof, please keep it away from water

4 Pack Ultra-Bright and Durable Fairy Lights Battery Operated with Timer and Remote: Each set includes 4pcs of battery string lights and 2 remote controls. Each 20ft strand has 60 ultra-bright LEDs on durable silver-coated copper wire, 80FT total. Wrap them around a headboard, mantel, balcony, or reading nook for a cozy glow. Each strand runs on 3 AA batteries (not included), so you can place these battery lights anywhere without an outlet. The wire-to-battery-case connection is reinforced for added durability and reliable everyday use.
Prevent Tipping and Hide Wires for a Polished Finish
To prevent your arch from tipping, stabilize the base using cement, sandbags, or weighted plates. For outdoor setups, drive heavy-duty stakes or ground screws deep into the soil and secure the frame tightly with zip ties. If wind poses a concern, use guy lines set at approximately 45 degrees to anchor the arch discreetly or attach ratchet straps to fixed anchors for extra stability. To avoid uneven weight distribution that could cause tipping, ensure decorations are evenly spread across the arch rather than concentrated on one side. For a ring bearer pillow, similar attention to balance and pillow weight distribution can prevent it from slipping during the ceremony.
To hide wires and create a polished look, wrap chicken wire around the arch pieces before adding flowers and secure it with zip ties. Once floral arrangements are in place, cover any exposed mechanics and wire ends with flowers, greenery, or clustered stems for a seamless appearance. Wrap floral wiring with tape to tidy up visible wiring components. After decorating, test the arch’s balance, as adding flowers and weight may shift its stability. Finish by inspecting from guest-facing angles to confirm the supports are hidden and the overall look is polished.