Wondering how to build a wedding arch that looks stunning and holds up well? The key is choosing the right style for your venue, whether it’s a garden or an urban loft.
Use sturdy, weather-resistant materials like cedar for outdoor setups. With some simple tools and techniques, you can create a beautiful focal point for your special day.
Keep reading for easy, step-by-step instructions to craft your perfect arch.
Pick the Best Wedding Arch Style for Your Venue
Matching your wedding arch style to your venue’s architecture is essential. Round arches complement traditional gardens and romantic settings, blending seamlessly with natural curves and lush greenery. Square frames suit modern lofts and gallery spaces, offering clean lines that match contemporary design. Triangular designs work best in rustic or minimalist spaces, adding a touch of geometric interest without overwhelming the setting. For those hosting a smaller celebration, party favor bags can double as decorative accents and take-home gifts for children.
Next, scale the arch to fit your space. High ceilings in grand venues can handle full floral arrangements that create dramatic entrances. For smaller interiors, opt for understated frames or slim structures to prevent the room from feeling crowded. Coordinating your color scheme with the venue’s atmosphere is also key. Rustic barns benefit from natural wood finishes and asymmetrical greenery to maintain an organic feel. In elegant ballrooms, soft and romantic blooms complement existing decor without clashing.
Avoid overloading gardens with heavy florals, as natural landscaping should be the star. Likewise, steer clear of tall arches in rooms with low ceilings to prevent overwhelming the space. If working with traditional churches, keep geometric shapes subtle to respect the architectural style. For capturing the final setup, a ring light with stand can ensure consistent, flattering lighting for detailed photographs.
Gather Materials and Tools for Your Wedding Arch
To build your wedding arch, you’ll need a selection of materials and tools. Opt for weather-resistant cedar if you’re planning an outdoor setup; it withstands the elements better. For indoor arches, pine or poplar work just fine as they are easier to handle. Standard sizing includes 2x4s for the frame and 4x4s for the legs, ensuring stability.
Use wood screws, L brackets, and carriage bolts to create strong, durable joints. Rope or zip ties are useful for attaching decorative elements and securing loose ends. For decorative enhancements, gather floral wire, foam, and fabric to customize your arch’s appearance. Lighting options such as string lights or lanterns add ambiance, and lightweight plywood makes a portable backdrop easy to move if needed. For a glowing effect, consider using a top rope with lights to elegantly drape across the arch. For the ring bearer, a best pillow for ring bearer can be placed at the base of the arch for a charming display.
Tools you’ll need include a drill, a circular or miter saw for cutting wood, a measuring tape to ensure precise dimensions, clamps to hold pieces steady during assembly, and a level to keep the arch straight. Sanding sheets are essential for smoothing rough edges before staining or painting. Safety gear like gloves and glasses should always be on hand for protection, and tent pegs or sandbags will help stabilize your structure during assembly or outdoor use.

Made of Cedar and Recycled Poly Lumber

High marine grade 305 stainless steel

Quality-Crafted Wood Duck Nesting Box; Made By Amish Craftspeople in Shipshewana, Indiana.
Measure and Cut Your Wedding Arch Frame to Size
Begin by measuring and marking the finished dimensions of your wedding arch on a flat surface. Aim for about 8 feet tall and 7 feet wide overall, with a central opening approximately 5 feet wide and 7 feet high. Accuracy is crucial, so double-check your measurements by remeasuring diagonals and opposing lengths before making any cuts. Use a tape measure and a carpenter’s pencil to transfer each mark, and label each piece clearly, such as side posts or crossmembers. Mark the waste side to prevent errors during cutting.
To determine the cut angles, first dry-fit the pieces on the floor. Square cuts are suitable for most members, but the arch top may require mitered ends for symmetry. When using a miter saw, wear eye and ear protection, secure the stock properly with clamps, and keep your hands at least six inches from the blade. Support long boards at table height to ensure stability. After each cut, compare the piece to your layout plan, test-fit it on the floor, and trim only small amounts at a time to maintain the frame’s balance.
Assemble Your Wedding Arch Frame With Joinery and Brackets
To assemble your wedding arch frame, start by dry-fitting each piece on a flat, level surface to ensure all joints align properly before attaching any fasteners. This step helps prevent twisted corners and guarantees the frame stays square. Use temporary clamps to hold brackets flush against the mating surfaces as you work. Opt for trade-quality galvanized steel corner brackets that match your wood’s thickness to achieve the strongest connections. Pre-drill pilot holes through the bracket openings to prevent splitting, especially near the ends of boards. Secure the joints with structural screws or bolts, tightening only after confirming the frame is perfectly square. To add extra rigidity, reinforce the joints with mortise-and-tenon joinery, inserting pegs where needed. Combining joinery techniques with brackets results in a sturdy frame capable of supporting decorative weight without buckling. For securing balloons to the arch, you can use a balloon tying tool on pump to quickly attach them without tying individual knots.

Size: 2-7/8" x 2-3/8" x 2-7/8", 1/8" thick

Low carbon steel, hot dip Al-Zn finish

HEAVY-DUTY CONSTRUCTION: These galvanized L brackets are made of high-quality steel for durability and strength.
Stabilize Your Wedding Arch With Weighted Bases
To stabilize your wedding arch, place ballast at each foot rather than just the center. Use weights like sandbags, concrete blocks, or metal weights on hard surfaces such as patios or indoors. For each leg, aim for about 40 pounds of weight to ensure a sturdy base. On soft ground like soil or sand, drive stakes or rebar deep into the ground for added stability. Avoid placing heavy decorations at the top; keep bulky elements centered to lower the arch’s center of gravity. In windy conditions, add extra ballast to prevent tipping. Before hanging decorations, secure all parts to reduce sway or collapse.

Upgraded 2.0: 5-Layer thickened material, reinforced edging & enlarged fill port. Even if a 50kg girl stands on it, the weights for arch stand won't break. High-frequency thermal sealing delivers exceptional airtightness, reliable quality and long life

🔶 Heavy-Duty PVC Construction - grade PVC with high-frequency heat-sealing technology ensures 100% leakproof performance. Reinforced seams withstand 50+ reuse cycles - lasts 3X longer than standard plastic bags. Rustproof golden plating maintains elegance in outdoor weddings/events

Premium Durability & Strength: The weights for arch stand features upgraded 5-layer construction with reinforced edges and high-frequency heat sealing. Supports up to 50kg reliably, offering excellent airtightness and long-lasting performance. Heavy-duty backdrop weights withstands demanding use
Apply Your Wedding Palette Finish: Stain, Paint, or Whitewash
Once your arch is sturdy, you can focus on its finish—staining, painting, or whitewashing—to match your wedding palette. Start by sanding the wood until smooth and wiping off all dust to ensure even absorption. For staining, apply the product with a brush following the grain’s direction, then wipe off excess after one to five minutes to achieve your desired color. Whitewashing involves thinning white paint with water at a one-to-one ratio and wiping it back quickly for a distressed finish. Applying multiple coats increases opacity and coverage. For a quick color refresh on any attached silk flowers, specialty spray paints provide a uniform coat without damaging the delicate petals.
Consider the durability of each finish. For outdoor use, seal stained or painted wood with a water-based clear topcoat to protect against weathering. Avoid ambering on light-colored finishes by choosing the right topcoat. If you prefer a natural weathered look, skip sealing whitewashed wood, but be aware it won’t last as long and may require touch-ups over time. For a more durable outdoor option, note that LED strip light lifespan can vary significantly based on heat and moisture exposure. The finish you select influences both the aesthetic and lifespan of your structure. For evening receptions, consider adding bedroom string lights to your arch for a cozy ambiance.

Protects indoor wood surfaces such as furniture, windows, cabinets, trim and more

PROTECT WOOD SURFACES – Minwax Polycrylic Protective Finish protects and adds beauty to your interior wood projects, including woodwork, furniture, doors and cabinets. The clear top coat protects against scratches, spills, dirt and more.

Protects indoor wood surfaces such as furniture, windows, cabinets, trim and more
Attach Flowers and Greenery to Your Wedding Arch
To attach flowers and greenery to your wedding arch effectively, start with a sturdy foundation using floral foam, foam cages, or oasis blocks. Layer greenery first to create structure and conceal the mechanics; insert eucalyptus, ivy, or ferns at approximately a 45-degree angle. Let longer stems cascade downward to introduce natural movement and soften the overall look. Work from the bottom up, contouring along the arch line to prevent a symmetric appearance. To ensure the foam stays hydrated and secure within its cage, use zap straps passed through the cage holes to tightly fasten it. For additional guidance on display options, consider consulting top banners for tables. You can also achieve a similar effect by using creative DIY wedding backdrops that incorporate budget-friendly materials like fabric or paper.
Next, focus on flower placement. Begin with larger blooms such as roses or dahlias to establish the main focal points. Secure these with floral wire or zip ties, especially for heavier flowers, and trim any excess ties afterward to keep the design tidy. Fill in the gaps with medium and smaller flowers, working section by section to ensure even spacing and balance. Vary flower sizes and shapes for realism, and slightly bend stems to mimic natural growth, enhancing the organic feel of your arch.

Package contents: you will receive 6 packs of rectangle floral foam cages, which can be used to decorate your house with the fresh flowers, making your home more wonderful and attractive
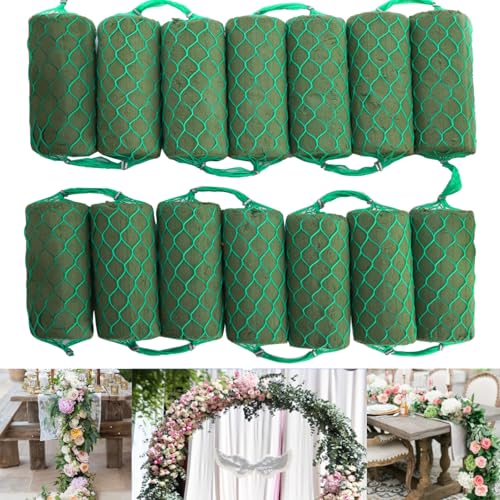
Product Details: Package includes 14 pieces netted floral foams, each size measures 2''D x 5''L, 10 Ft total length, easily soak water like a sponge to serve your fresh or dry flower crafts.

Sparkling Jeweled Straps:Features elegant rhinestone and pearl accents arranged in a beautiful floral design, adding a touch of glamour to your every step.
Hide Hardware on Your Wedding Arch With Natural Décor
To hide the hardware on your wedding arch, start with natural concealment by placing dense greenery directly over wire, zip ties, and bolt points. Overlapping wider leaves helps break up the hard lines, making the frame disappear. Draped fabric around crossbars and poles softens the structure and further masks hardware. Gather the fabric at multiple points rather than just one to prevent it from outlining the frame. Use leaf picks or small filler sprays to cover exposed ties and snipped wire ends. For the base, set wicker baskets or flower masses around weighted supports to conceal the hardware underneath. Clear zip ties and fishing line blend best, but always cut off any excess tails to avoid visible mess. For a more refined approach, consider using top uplights to create soft shadowing that hides remaining fastener details. Double-check all areas to ensure no bolt or tie end remains visible through your natural décor, maintaining a seamless look. To further obscure joints, apply a thin layer of fog just before the ceremony, which diffuses light and softens the edges of the frame. For a natural look, incorporate artificial roses that look real to blend easily with the greenery and fabric.
Test Your Wedding Arch Stability Before the Ceremony
To ensure your wedding arch stays stable during the ceremony, you must thoroughly test its stability before guests arrive. Start with a firm push test from multiple directions to identify any wobbling or movement. Tug on each anchor point to reveal weak attachments or loose fittings. Because added décor can shift the balance, recheck the structure after final styling to catch any new instability. Additionally, if your arch incorporates foil balloons, remember that reusing foil balloons can save costs, but only if they are carefully deflated and stored to prevent leaks. For a similar beautiful effect, snow machines rely on a high-pressure pump to atomize water into fine droplets. For a backdrop without a stand, you might consider using heavy-duty adhesive hooks that hold securely without damaging surfaces.
For wind testing, evaluate the arch in its actual setup location, not a sheltered workspace. Wind behaves differently in open areas compared to covered spaces. Treat wind ratings as a hard limit—most temporary arches can handle gusts up to 20 to 25 miles per hour. If the forecast predicts higher gusts, reinforce the arch immediately or consider removing it altogether.
Finally, perform a last stability check just before guests arrive, after setup crews finish. Keep spare weights and stakes nearby for last-minute reinforcement if needed. Preventing a wobble or collapse is crucial to avoid ruining your ceremony.