Thinking about installing LED strip lights and feeling unsure where to start? Getting the setup right ensures your lights look great and stay working reliably.
From measuring your space to choosing the right power supply and making secure connections, you can transform your space with a little know-how.
Keep reading for simple steps to help you get the perfect installation.
Choose the Right LED Strip Type, Then Measure Your Space
Measure your space accurately before purchasing your LED strip. Instead of relying on general room dimensions, trace the exact path where you plan to install the strip. For perimeter installations, add up the length of each wall section to get the total. In L-shaped or irregular areas, measure every alcove, corner, and distinct section separately. Record these measurements meticulously to ensure you buy a strip long enough to cover the entire area without gaps or shortages. Accurate measurements save you time and prevent waste or the need for extra extensions later on. For video work, a ring light with stand offers similar precision in illuminating a defined space. Additionally, ensuring your wiring and fixing points are properly planned will help you achieve a clean finished look. To ensure your lighting setup remains consistent in outdoor or large indoor areas, consider how weather-resistant hardware from premium cantilever umbrella models can inform your choice of durable LED strip enclosures and connectors.

Specification:2 pin male & female IP68 waterproof connectors with 16AWG wire.


Support LED Strip:3pin WS2812B WS2811 SK6812 SK6812RGBW WS2814 CCT RGBIC Addressable Chasing Color SMD LED Strip Light 10mm 0.39in Width
Pick a Power Supply That Won’t Let You Down
Choose a power supply that matches your strip’s voltage exactly—12V for 12V strips, 24V for 24V strips. Never mix different voltages, as mismatched power can instantly damage your components. Use a constant-voltage driver with proper voltage regulation to keep the output steady, even as current demands fluctuate.
Calculate the total wattage by multiplying the strip’s wattage per meter by the length you need. Then, add 20 percent headroom to determine the required power supply wattage. For example, if your strip consumes 4W per meter and you need 5 meters, total wattage is 4W × 5 = 20W. Including headroom, the PSU should provide at least 24W (20W × 1.20). Convert this wattage to current by dividing by your voltage (for 12V, divide by 12; for 24V, divide by 24). Lower voltage (24V) halves the current compared to 12V for the same wattage, making long runs easier and wiring simpler. As a matter of reuse and safety, always inspect foil balloons before re-inflating to avoid unstable voltage draws from damaged components. For a realistic alternative, consider best artificial roses that mimic natural beauty without maintenance.
Select a regulated power supply suitable for your environment. If your setup is in a damp or outdoor location, consider an IP-rated model designed for moisture resistance. For indoor use, standard units suffice. A certified, slightly oversized power supply ensures safety, longevity, and stable operation. Avoid generic adapters, as they often lack proper regulation, risking LED damage or flickering. Properly selected, a high-quality power supply keeps your LEDs bright, consistent, and reliable over time. For a reliable comparison, consider the best pillow for ring bearer as a similarly critical choice for your special occasion.
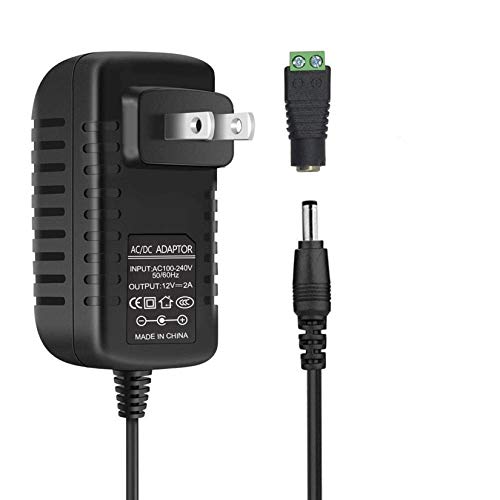
[INPUT&OUTPUT] 12V 2A power supply, 100-240V AC input, 50/60Hz, DC 12V 2A output, 24 Watt (24W) maximum power output

DC 12 volt LED Power Supply: Input: 90-265V AC 0.85A 50/60HZ, Output: 12V DC 2.5A 30W. Converts AC 110V/120V to DC 12V, 3.3 feet power cord with US standard 3-prong plug. Low power consumption, high efficiency stability of the 12V 30W LED driver

Important Note: 1. Before purchasing, please check whether the working voltage of your device is 12V and the current is not greater than 5A; Please do not use for 5V 9V 19V 20V 24V 36V devices and other devices require lower or higher working voltage than 12 volts 2. Check whether the DC connector is the same size as the product
Solder Wires for a Stronger, Longer-Lasting Joint
To ensure a strong, long-lasting solder joint, follow these steps carefully. First, clean the strip pads by removing any silicone or coating until you see bare, shiny copper. Applying flux helps the solder adhere better and improves conduction. Pre-tin each pad with a small solder dome by heating the pad and introducing solder until it fully wicks in. When preparing the wire, strip 3–5 millimeters of insulation from stranded wire, then twist the strands tightly and pre-tin until solder fully wicks in. Hold the iron at a shallow angle to improve contact and heat transfer. Unlike sparklers, LED strips do not have an indefinite shelf life, but proper storage away from moisture can prevent pad oxidation that weakens solder bonds. Hold the tinned wire against the pad, then touch your iron to both surfaces simultaneously. Maintain the heat for 1 to 3 seconds, allowing the solder pools to merge. Avoid overheating to prevent damage. A proper solder joint appears shiny and slightly concave, indicating good wetting and solid contact. Once cooled, protect the joint with heat-shrink tubing and add strain relief to prevent tugging from loosening the connection. This careful approach helps maximize the overall lifespan of your installation by preventing common failure points.

Time Saver: Solderless,crimpless, all you need is just a heat gun to finish the joint, much faster and easier than the old way
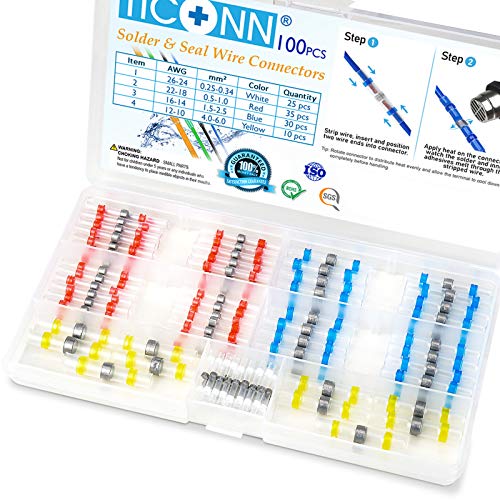
One-Step Solder & Seal: These solder stick wire connectors bond in one step with just a heat gun, no crimping tools needed; A faster alternative to traditional soldering connectors that saves time on every wiring project

Effortless and Fast Operation: Skip soldering and crimping; use a heat gun for a quick and easy junction, significantly faster than traditional methods
Use Solderless Connectors for Quick Joins
Solderless connectors are an efficient alternative to soldering for joining your LED strip sections quickly. They require no heat or flux, making installation safer and faster. The clip-on and press-fit styles allow you to connect strips to other strips or to wires seamlessly. To use, cut the strip at the marked line, slide the copper pads fully into the connector, and then close the locking tab until it clicks into place. For making sharp 90-degree turns, a corner connector is ideal. For branching layouts, T-shaped splitters are best suited. Always ensure the connector width and pin count match your strip—whether 2-pin, 4-pin, or 5-pin—to keep the channels aligned correctly. These connectors support low-voltage 12V or 24V LED strips and help maintain a sleek, unobtrusive appearance. Since no soldering is needed, integrating wireless control modules becomes straightforward without adding extra wiring complexity. Be sure to double-check your insertion depth and polarity before locking to prevent failures caused by misalignment or loose tabs.

【Compatible Lights】This installation accessories set is ONLY compatible with 8mm width 2-Pin COB LED Strip lights(Not applicable to 10 mm board width and CCT Tunable COB LED Strip Lights).The strip to wire transparent connector allows you to easily connect a COB strip to another COB strip with wire without soldering

【LED Solder-less Gapless Connector】Only support the SPI/PWM 4PIN 10mm(0.39in) width WS2813,SK9822,WS2815,WS2805,WS2808 RGB5050 LED Strip(IP30/65). Note:Not for 2Pin 3Pin 4Pin 5Pin 5mm/8mm/12mm width SMD/FCOB 5mm/8mm/10mm/12mm LED Strip.

You need to simply slot strip light into connector and close (no need soldering).(Can not support 144LED/m led strip)Can't Support ALTOVE LED Strip
Avoid Voltage Drop on Long Runs and Corners
Voltage drop is the primary reason your LED strip appears dimmer at the far end or takes on a warmer tint. Resistance in the strip’s traces and wiring causes power loss over longer distances, resulting in uneven brightness. To combat this, use 24V LED strips for runs longer than 5 meters, as they reduce current and voltage drop compared to 12V options. Implement wiring strategies such as breaking long runs with parallel feeds or injecting power at midpoints where brightness diminishes to maintain consistent output. Feeding power from both ends of the strip can also shorten the electrical path and improve evenness. When navigating corners, avoid routing power through every turn, as each adds resistance. Instead, run separate wires directly to each section for better voltage stability. Additionally, choose a main cable size of at least 12 to 14 AWG, as thicker wiring lowers resistance and voltage loss. Keeping your voltage drop within 3 to 5 percent ensures uniform brightness across the entire length of the LED strip. For a similar principle of maintaining consistent voltage stability across complex layouts, sequin wall installations benefit from even power distribution to avoid dim spots.

【Interesting Multi-Function】You can choose 20 static colors with adjust brightness, turn On/Off. And multiple control modes: Flash, Strobe, Fade, RGB Smooth-change, Static, DIY frequently, use modes as you like.

Prewired with a 60 in. removal AC cord with plug for use in a standard 120-volt AC outlet

【24 volt dc power supply 2A】Input AC 100v~240v, output DC 24V 2A,50/60Hz, 48W max.24V power adapter for led lights
Mount the Strip Securely and Fix Common Problems
To mount your strip securely, start by preparing the surface properly. Use smooth, non-porous materials like painted wood or glass. Clean the area thoroughly with a cloth to remove dust, then degrease with isopropyl alcohol. Allow the surface to dry completely before proceeding. For glossy surfaces, lightly scuff them with fine sandpaper to improve adhesion. Similarly, the earliest tablecloths served both protective and decorative functions, safeguarding the table surface during meals. For installations on high-moisture or uneven surfaces, selecting top double-sided tapes designed for LED strips is critical to prevent premature failure. To create a visually appealing arrangement, you can also apply the same careful surface preparation techniques used in crafting flower balls.
When applying the strip, remove the backing gradually and press firmly along its length to ensure it sticks evenly. Keep the strip straight during application to prevent kinks. On rough or humid surfaces, adhesive alone may not suffice. Add mounting clips every 30 centimeters or install aluminum channels to provide extra support. If the strip begins to peel, it generally indicates insufficient surface preparation or poor adhesion.
Sagging or loose mounting can be fixed by adding more clips or installing a channel for support. For persistent failure, switch to screw-fixed brackets for a more robust hold. Always check the alignment before fully pressing down, and after mounting, inspect for any lifting edges or bubbles to ensure a secure, professional finish.