Looking to set up a fun photo booth without breaking the bank? You can create a DIY kit for under $300 using simple tools like a tablet, tripod, and a basic backdrop frame.
With some everyday materials and a bit of planning, you’ll have everything ready for your event. Keep reading to see how to put it all together step by step.
What’s in a DIY Photo Booth Kit?
The core hardware for a DIY photo booth includes a camera—such as a DSLR, mirrorless, point-and-shoot, webcam, or tablet—mounted on a sturdy tripod, chassis, or booth shell. This setup helps keep the camera stable for clear, sharp images. Pair it with a display screen, computer, and printer to offer instant prints for your guests. Photo booth filters are also essential, allowing you to tweak each shot in real-time for fun effects or improved quality without extra editing. Lighting is key, so a ring light or softbox ensures faces are evenly illuminated and vivid. For optimal results, choose a ring light with stand that offers adjustable brightness and color temperature to flatter any skin tone. To enhance the guest experience, include a backdrop stand and themed props like hats or speech bubbles. The software acts as your control panel, managing countdown timers, overlays, and printing commands to turn raw photos into memorable keepsakes. Make sure you have a reliable power supply, enough cables, and a remote shutter for smooth operation, especially during busy moments. For a professional finish, mount flash units like Bowen Gemini heads to ensure consistent, powerful lighting. For round table setups, a properly fitted tablecloth helps create a clean foundation for your backdrop stand and props. This foundational setup provides everything you need to start creating your own photo booth. For larger events, selecting a top party banner as a backdrop can add a festive theme and make your photo station stand out even more.
How Much Should You Spend on a DIY Photo Booth Kit?
Your DIY photo booth budget should align with your goals, ranging from roughly $300 for a basic digital-only setup to over $12,000 for a high-end professional build. For casual parties, expect to spend between $300 and $700, primarily on a tablet-based system with simple accessories. If you’re aiming to start a side business, budget around $1,200 to $2,500, which covers a better camera and improved lighting.
For wedding or rental purposes, the range jumps to $3,000 to $6,000. This level requires a DSLR or mirrorless camera, a dye-sublimation printer for instant photo printing, and sturdy stands for reliable setup. Software subscriptions are also necessary, costing between $100 and $900 annually. A budget-friendly kit might omit the printer and use basic lighting, lowering costs but sacrificing image quality and creative options. To get sharper images and more versatile backdrops, investing in a mid-range build is recommended. Always keep some funds in reserve for replacement parts and transportation costs. Ultimately, your budget determines the quality, durability, and professional appearance of your photo booth.
Cheap Backdrop Ideas That Look Good on Camera
You don’t need to spend a lot on a backdrop to achieve polished and professional-looking photos. Start with crepe paper streamers—layer different widths and colors for a textured, high-contrast backdrop that appears upscale on camera. Hanging the streamers tightly prevents gaps and introduces movement, making them ideal for candid shots. For a sleeker finish, iron a plain bedsheet in cream or navy; its non-reflective fabric minimizes glare when using a flash. Fairy lights can add depth and separation, especially in dim indoor spaces, when draped behind your subject. Balloon garlands or paper fans bring volume and vibrant color—stick to a coordinated palette for best visual impact. You can also experiment with textured backdrops like metallic confetti or bold wrapping paper to add sparkle. Combining these choices with soft or warm lighting styles helps your setup look intentional and refined without a hefty price tag. For a truly layered effect, weave in homemade paper lanterns as hanging accents to echo the same crafty, low-cost aesthetic while adding soft ambient glow. If you reuse foil balloons as part of your garland, check for leaks first to ensure they stay inflated for the entire event. For brand-focused events, consider using custom logo tablecloths as a sturdy, reusable backdrop that balances professional branding with easy setup.
How to Size and Build a Backdrop Frame for Your Kit
A 7-foot-tall by 8-foot-wide PVC frame is a common size that works well for most fabric or paper backdrops. This size provides enough height and width to fill standard photo areas without overwhelming a typical setting. If your space is smaller or you prefer a more compact setup, a 6-by-7-foot frame is a suitable alternative, offering a tight fit while still supporting your backdrop material effectively. Secure the base legs to wood panels using 1-inch screws and table caps for a stable foundation. When storing the frame, apply helium tank safety tips to prevent creases and damage to the PVC components during packing.
To build this frame, cut PVC pipe into two 7-foot uprights and one 8-foot top bar. Add four 4-foot base legs for stability, ensuring the structure remains steady during use. Remember to account for the depth of connectors when measuring and cutting, so the backdrop material won’t sag or bunch up. Unlike cutting fairy lights, which can damage wiring and create electrical hazards, PVC pipe is safe to cut with standard tools. For a neat finish, ensure your cuts are square and smooth the edges with sandpaper to avoid snagging fabric.
Using 1-inch PVC pipes along with tee fittings increases the frame’s durability. This combination creates a sturdy, rigid structure without adding unnecessary weight, making it easier to transport and assemble. Modular design is also recommended, allowing you to break down the frame into manageable parts for storage and travel. Skip wood unless you need extra strength, as PVC offers a lightweight, versatile option perfect for straightforward photo booth setups.

Size - Length of each: 17";The 1 inch Schedule 40 PVC pipe has an outer diameter of 1.315 inches and an inner diameter of 1.02 inches. This PVC pipe is suitable for various DIY projects.Please confirm before purchase.

Package Includes: you will receive 32 pieces greenhouse clamps; Enough quantity to meet your daily use and greenhouse replacement needs
Simple Lighting Setup for Flattering Photos Under $50
A simple under-$50 lighting setup can produce professional and flattering DIY photo booth photos. Start with a large window as your main light source, positioning your subject 1 to 3 feet away at a 45-degree angle. This placement softens shadows, creating a more even skin tone and reducing harsh contrast. To further diffuse the light, hang a sheer curtain or white bedsheet between the window and your subject. This creates a “cloudy day” effect, enhancing softness and minimizing glare. For similar soft diffusion when cleaning silk flowers, avoid using harsh chemicals that can damage delicate petals. Investing in traditional Chinese lanterns can also add festive ambiance to your setup. If you are also choosing decorative elements for the event, consider the best pillow for ring bearer to ensure a cohesive and elegant presentation.
Control your lighting direction by adding bounce. Use a white foam board or poster board as a reflector on the shadow side of your subject; these materials cost less than $10. Avoid pointing your lamps directly at faces, as this can produce unflattering harsh shadows. Instead, bounce light off a white surface to distribute it evenly, reducing under-eye shadows and harsh highlights.
For a two-point setup, use one clamp light with a 1000 to 1500 lumen LED bulb. Position this light at approximately 45 degrees and slightly above eye level. Ensure all your lights share the same color temperature to prevent unpleasant mixed lighting effects. This simple configuration offers a professional look without exceeding your $50 budget.

【Upgraded Flash Softboxes with Wider Compatibility】 Includes a 6"x5" (15 x 12.5cm) rectangular softbox and a 6" (15cm) octagonal softbox for versatile lighting effects. The upgraded design expands its compatibility with NEEWER Z1 Z2 round head flashes, and still compatible with Godox TT600 TT685 V860II V860III V1 Canon Nikon Sony NEEWER Z760 NW700 NW620 TT560 NW635II NW645II NW655 NW665 NW670 750II square head flashes
Diffusion Fabric: Effectively soften the light of natural light and all kinds of film and photography lights.
![Flash Diffuser Light Softbox [3-Pack] for Speedlight Photography Accessories, Compatible with Canon 560 565EX 580EX Godox V850 V860 TT600 TT685](https://m.media-amazon.com/images/I/31G84RWsVPL._SL500_.jpg)
Elevate Your Lighting Game Compatible with Godox: 🌟 Experience professional-grade lighting with Godox, a trusted high-tech manufacturer since 1993. We specialize in lighting equipment to enhance your photography experience. Our Flash Diffuser Light Softbox ensures superior light diffusion and uniformity, delivering stunning results.
Best Camera and Smartphone Mounts for Stability
To ensure maximum stability, your camera or phone must stay perfectly still once your lighting is set. The key lies in choosing the right mount and tripod. For tripods, prioritize sturdy metal construction with a 1/4-20 threaded screw for universal compatibility. A wider stance offers better resistance to tipping, especially with heavier gear, while a lower center of gravity helps stabilize larger setups. Quick-release plates streamline the process, allowing you to attach and remove your device swiftly without sacrificing security. It is important to note that sparklers in NYC have specific safety rules you should follow to avoid fines. For a lightweight alternative, constructing a balloon arch without a stand can serve as a stable and decorative backdrop structure.
For smartphones, select a clamp built with screw-lock or tension-based mechanisms. These mounts feature tight grip pads that prevent slipping better than spring-only grips, especially during movement. A low-profile design minimizes wobble by reducing leverage on the device, keeping it steadier.
When mounting cameras, always use a dedicated mounting plate. Metal hardware provides greater stiffness and stability, preventing twist and sideways movement that can ruin shots. Make sure every joint is tight; loose connections are the most common cause of instability. Properly fitting mounts ensure your device remains secure and steady throughout your shoot. This same principle of stability is critical when selecting a round arch for your wedding setup.

1.Camera mount conversion adapter allows you to mount almost any camera to any GoPro mount ecosystem accessory. It fits any standard 1/4”-20 cameras attach to GoPro mount, tripod, bicycle handle bar and other accessories.
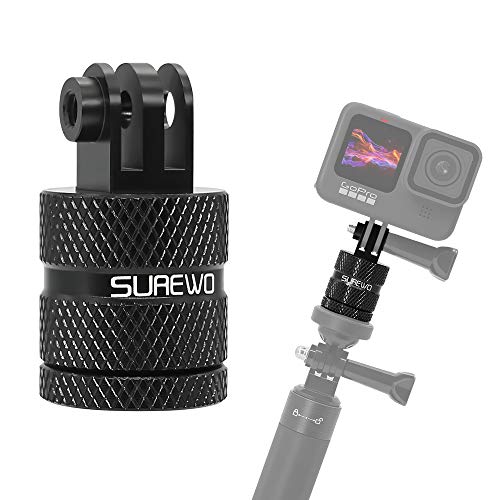
High-quality material: This 360 degree rotation metal bracket 1/4 inch tripod adapter is made of high rigidity aluminum alloy casting with precision CNC , which is not only durable but also light!

Strong Aluminum Metal Compatibility: All Metal camera mount converter can easily mount any 1/4 camera on another device, such as action camera, monopod and more, convenient and quick to use, Fits the standard sport cameras with a standard 1/4-inch 20 threading
Hands-Free Triggers and Timers for Easy Group Shots
A live preview on your trigger device allows you to see exactly how the shot will look before it fires. This feature lets you adjust your framing in real-time, ensuring everyone is positioned perfectly. When combined with remote triggers and timed delays, it creates a truly hands-free booth experience. No one needs to touch the camera, which helps reduce blurring and misalignment. As a result, you get better group shots with minimal effort, making the process smoother and more fun for everyone involved. For example, a similar focus on realistic petal texture ensures that faux floral arrangements on the arch appear lush and natural in the background of every photo. While not directly related to napkins, a similar attention to textile quality can elevate the table setting for a festive Thanksgiving. For instance, using cloth napkin folding techniques ensures silverware stays neatly in place throughout the meal.

Only remote control + white box. The green cable is not included, if you need the cable please click "Visit the MWE Store" above to buy it separately


Solid metal foot pedal equipped with 5M cord & 3.5mm female jack, packaged with S2 Multi + Type-C two dedicated Sony cables with full compatibility as below: ✅ S2 Multi Cable: Sony A1,A1 II,A9,A9II,A9 III,A7,A7M2,A7M3,A7M4,A7S,A7SII,A7S3,A7R,A7R2,A7R3,A7R4,A5000,A5100,A5300,A6000,A6100,A6300,A6400,A6500,A6600,NEX-3,RX10,RX10M2,RX10M3,RX10M4,RX1R,RX1RM2,RX0,RX0II,RX100M2,RX100M3,RX100M4/M5/M6/M7 ✅ Type-C Cable: Sony A7V/A7M5,A7CR,ZV-E10 II/ZV-E10M2K,A6700,A7C II,ZV-E1; NOT compatible with A7C & first-gen ZV-E10 Replace cords to match different Sony camera ports easily.
Printable Props and Signs That Add Variety Without Costing Much
Printable props and signs offer a versatile way to enhance your photo booth without stretching your budget. You can find over 700 free PNG files online, including fun mustaches, glasses, speech bubbles, and emojis. Many websites categorize these by themes like weddings or garden parties, making it easy to match your event’s style instantly. To customize props, use templates that allow you to swap out text for occasions such as birthdays or bridal showers. Print these on 200 gsm cardstock at full size for sturdy props that will last all night. Use large popsicle sticks or dowels as handles, and glue two layers of cardstock together to add support and hide the stick. To keep your event table tidy, you can also apply a crisp, wrinkle-free finish to your tablecloths by folding them carefully. Signs like “Oh Snap!” or welcoming messages can be printed at home or ordered through a print shop to guide guests. This approach provides a wide variety of props and signs while keeping costs minimal. For a kids’ party, you can also include top party favors like themed bubbles or mini toys to match the photo booth fun.
Printer vs. Digital-Only: Which Photo Delivery Works for You?
Opting for digital-only photo delivery is the quickest way to share images and save money. Guests can immediately access their photos by texting a link or scanning a QR code, making it ideal for those active on social media. With no printed materials or consumables needed, setup is simpler and maintenance is minimal. However, it relies heavily on a stable Wi-Fi connection; if the internet drops, some systems will store photos and send them later. This approach suits events where speed and cost-effectiveness are priorities, and guests are comfortable using their devices to retrieve the images.

PICTURE-PERFECT PRINTS Built-in flash and LED ring light make it easy to get that picture-perfect shot, every time. Select your layout, frame, and filters and get a live view of it all on the 10.1” LCD touch screen before hitting print.

SHARE WEDDING MEMORIES INSTANTLY: Make it easy for guests to upload and access event photos with this stylish 7x5-inch arch acrylic photo QR code wedding sign. Simply scan the QR to join the shared photo album—no apps needed. Perfect for modern and minimalist weddings.
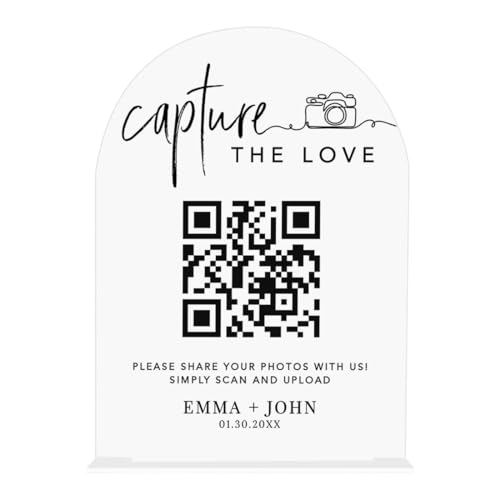
SHARE WEDDING MEMORIES INSTANTLY: Make it easy for guests to upload and access event photos with this stylish 7x5-inch arch acrylic photo QR code wedding sign. Simply scan the QR to join the shared photo album—no apps needed. Perfect for modern and minimalist weddings.
Final Checklist for Testing Your DIY Photo Booth Kit
Before your guests arrive, perform a comprehensive run-through of your entire photo booth kit to ensure all components work smoothly together. Start with hardware: place your base on a flat, stable surface, secure your backdrop to prevent shifting, and organize cable runs neatly to avoid tripping hazards. Conduct lighting calibration by powering on all lighting units, checking for uneven illumination such as harsh shadows or hotspots, and adjusting angles as needed to achieve even lighting on faces.
Next, clean the lens thoroughly to prevent smudges or dust from affecting photo quality. Run test shots using auto-focus to verify that exposure, framing, and color balance are accurate across different skin tones. Then, troubleshoot your software by launching the app, testing the entire capture-to-preview flow, and confirming that retakes and saved settings survive a reboot. Finally, load paper and ink into your printer, print a test photo, and time the process from start to finish, aiming for under 30 seconds. Conduct several consecutive captures to ensure the system remains stable without crashing under continuous use.