Making your own cloth napkins is a simple way to add a personal touch to your table setting.
With just a few supplies and some basic sewing steps, you can create durable, clean-looking napkins that fit your style.
By the end, you’ll be able to sew professional-looking corners and hems for a polished finish.
Keep reading to get the full step-by-step guide.
Decide Between a 16-Inch or 18-Inch Napkin Size, Then Pick Cotton Fabric
Choose either a 16-inch or 18-inch napkin based on your needs. Opt for 16 inches for casual lunches and lighter place settings because it is easier to store and press. Go with 18 inches for everyday dinners, as it provides better lap coverage and offers a more traditional look.
Once you’ve decided on the size, select a medium-weight, tightly woven cotton fabric. This ensures durability through frequent washing without losing softness or absorbency. Prewash the fabric to prevent shrinkage after sewing. Decorative stitches can be added later during hemming. Solid-colored fabric typically reads as more formal, while printed cotton feels more casual. Cotton is ideal for repeated laundering and maintaining a soft, absorbent surface. It is also the simplest fabric to cut and sew, making it a practical choice for durable, reusable napkins. For outdoor dining, consider using sturdy yard stakes to secure your tablecloth from wind. If you are looking for a decorative accessory for a special event, a pillow for ring bearer can be chosen with similar care for fabric and size. For a formal wedding ceremony, matching your napkin fabric to wedding chair covers can create a cohesive and elegant tablescape.


Elevate your dining experience with this set of 10 premium cotton napkins, providing versatility and style for various occasions, whether it's a casual family meal or a formal dinner party.

Wondefully Crafted from 100% Premium 60S Cotton: Unlike most handkerchiefs in the market of 30s or 40s, the 60S cotton makes the hankies naturally soft
Cut Your Cloth Napkin Fabric Squares Accurately for Even Hems
Start by squaring your fabric before measuring and cutting to ensure even hems. Press the fabric first to remove wrinkles, then align the selvedges to create a precise 90-degree corner. Use a clear grid ruler on a cutting mat for accurate measurements. Place the ruler’s zero line exactly along the straight edge, then cut in a single, continuous pass with a rotary cutter for maximum precision. For added precision, consider using the Creative Grids Square on Square Trim Tool which features a non-slip grip to hold fabric firmly during cutting. For best results, treat your fabric as carefully as silk flowers to avoid fraying or distortion during the cutting process. For a fun alternative for celebrating with fabric, you could use confetti cannons for a memorable reveal.
Cut one clean edge first, then measure from that edge for each subsequent square. Avoid relying on the factory edge, as it is often uneven. After cutting, fold each square in half and diagonally to check that all corners meet exactly, confirming the squares are uniform. When making multiple napkins, keep cut edges aligned and reuse your initial square as a template. Maintaining consistent squares helps produce even hems and professional-looking results.

SEWING, ARTS, AND CRAFTS STAPLE: This Fiskars Rotary Cutter can cut batting, foams, multiple layers of fabric, and quilting materials; Ideal for doing arts and crafts for adults or kids; Great addition to your sewing accessories and quilting supplies

SELF HEALING ROTARY MAT - Our rotary mat is self-healing, it reseals surface cuts for a continually smooth cutting surface. Using a self-healing cutting mat extends the life of your blade and protects the surfaces of your work area.

SEWING, ARTS, AND CRAFTS STAPLE: This Fiskars Rotary Cutter can cut multiple layers of fabric, felt, vinyl, and quilting materials; Ideal for doing arts and crafts for adults; Great addition to your sewing accessories and quilting supplies
Fold and Press Your Fabric Edges Before Sewing a Double-Fold Hem
To fold and press your fabric edges correctly for a double-fold hem, start by folding the raw edge about 1/4 inch to the wrong side of the fabric. Use a sewing gauge or ruler to keep this measurement consistent along the entire edge. Press this first fold firmly with an iron and pressing tools to set the crease. This initial crease helps guide the second fold and ensures a smooth, even hem. For a secure hold during preparation, consider using high-quality double-sided tape similar to what is recommended for LED strip lights. Adding ambient string lights to your sewing space can create a cozy atmosphere while you work on this precise task.
Next, fold the raw edge inside again to the desired finished depth, guided by the first crease. Press this second fold thoroughly to lock the shape in place. Pressing tools like a pressing template or a piece of silk organza can help achieve crisp, even edges without burning the fabric. Once pressed, your fabric is prepared for clean, precise sewing. Pre-pressing folds prevents the top edge from stretching when you fold it, which is a common cause of distortion in this method. Just as with outdoor curtain lights, careful preparation and pressing of your fabric edges ensures a professional, distortion-free result.

1PCS Double Fold Clean Finish Swing-Away Hemmer Attachment For Industrial Sewing Machines(Hem Size 1/2(13mm)).

Four must-have quilting and crafting tools in one

Measurement: the width of double fold bias tape is approx. 1/2 inch, total length is 10 yards, enough for you to use, and easy to sew by your hand or machine to make straight or curved edges; This tape is not completely continuous due to the length and nature of the textile
Create Mitered Corners Inside Your Hem for a Crisp Finish
To create mitered corners inside your hem for a crisp finish, start by pressing both folds of your double-fold hem. Then, mark the exact point where the inner hem crease intersects with the edges of the folded fabric. Connect these marks with a short diagonal line, centered precisely so the fold edges meet cleanly.
Sew along this diagonal line first, backstitching at both ends to secure the seam. Keep the stitch short and accurate to lock the mitered corner inside the hem. Next, clip the excess fabric close to the stitches, angling your cut to reduce bulk. Turn the corner right side out, using a blunt tool to push out a sharp point, and spread the seam allowance flat. This technique is similar to how different banner types are finished with reinforced edges for durability, and achieving a precise finish requires the same attention to detail as selecting best artificial roses that look authentic.
Finish by topstitching close to the inner hem edge, pivoting with the needle down at each corner to maintain accuracy. Well-executed, this technique ensures each corner is crisp, professional-looking, and durable. For video demonstrations of similar precise stitching tasks, lighting with a stand can help you see every detail clearly.

𝑩𝒊𝒓𝒕𝒉𝒅𝒂𝒚 𝑮𝒊𝒇𝒕𝒔 𝑰𝒅𝒆𝒂𝒔: This sewing kit is terrific gifts for people who travel frequently, mother, grandmother, backpacker, adults, kids and teen girls! The emergency kit is also suitable for both men and women, beginners and professionals alike, and it is definitely something that everyone needs in their life
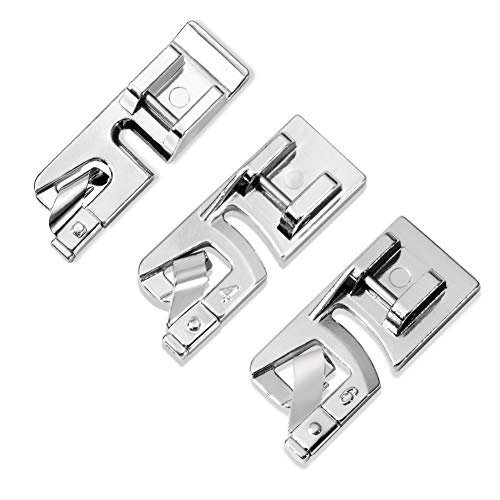
General Sizes: This rolled hem presser foot kits including 3 sizes for 3mm/4mm/6mm, widely used in kinds of jamming projects. will help you easily create beautiful curls on lightweight fabrics

Complete Sewing Kit-The travel sewing kit contains all the necessary tools that are required for performing basic repairs-a scissor, threads (18 colors), 30 sewing needles, shirt buttons, seam ripper, needle threader tools and a foldable tape measure.
Give Your Napkins a Final Press and Start Using Them
After pressing and mitering your corners, give your napkins a final press while they are still slightly damp. This step helps make wrinkle removal easier. Start on the wrong side of the fabric, then finish on the right side to achieve a smooth, professional look. For dark-colored napkins, only press the wrong side to protect their color and finish. Allow them to air-dry completely before folding to prevent new creases from forming. A quick steam touch-up afterward can relax stubborn wrinkles and ensure a crisp presentation. Consider using a dedicated pressing surface for the best results, similar to how you would set up a workspace for custom placemats. Achieving a neat finish like that of a honeycomb centerpiece requires careful attention to each press.
Once cooled, your cloth napkins are ready to use. Proper pressing and folding enhance their appearance and durability. Regular washing, prompted by meal stains and dirt, maintains cleanliness and freshness. Wash them every few uses with hot water if the fabric allows for sanitary cleaning. Store the napkins in a dry, breathable location to keep them fresh and ready for your next meal.

Proper Size&Multi-Colors for Different Table Setting : PLOYMONO cloth polyester napkins add a pop of color and sophistication to your table. Available in a variety of elegant colors, these dinner napkins are perfect for special occasions to suit your specific table setting needs. Our cloth table napkins measure 17 inches square, providing ample coverage for your guests and an ideal size for folding.
![Utopia Home [12 Pack, Black] Cloth Napkins 20x20 Inches, 100% Polyester | Hemmed Edges, Washable and Reusable Ideal for Parties, Weddings and Dinners](https://m.media-amazon.com/images/I/41Ad280nkiL._SL500_.jpg)
Event Ready Table Presentation - A set of 12 cloth napkins that brings a polished look to your dining table. Designed as classic dinner napkins, they upgrade everyday meals and special gatherings in a way guests notice the moment they sit down.
![Utopia Kitchen Cotton Blend White Cloth Napkins [12 Pack, 18x18 Inch] | Absorbent Washable and Reusable for Dinner, Restaurant, Lunch, Wedding and Hotel](https://m.media-amazon.com/images/I/41M+y-svIiL._SL500_.jpg)
Value Pack – The 12-pack provides you with enough dinner napkins for all your household needs for today, tomorrow; and the future. With the perfect size of 18 x 18 Inches, anyone can handle these napkins with ease.