Thinking about adding LED strip lights to your ceiling but unsure where to start? The key is measuring your route carefully so the strips fit perfectly, with some extra length for corners.
Preparing the surface and mounting everything securely is essential for a clean, professional look.
By following these simple steps, you’ll be able to set up your lighting safely and efficiently.
Keep reading to see how to get it all done right down to the last detail.
Measure Your Ceiling and Plan the LED Strip Route
Determine the route for your LED strip before measuring to ensure an accurate length. The route you choose dictates the length needed, not the room’s overall dimensions. For a simple rectangular perimeter, use the formula: 2 times the length plus 2 times the width. For custom routes, measure each individual wall or ceiling edge separately, including all turns and corners.
Avoid relying solely on floor measurements, as they can be misleading. Your measurement must follow the actual installation path along walls or ceiling edges. When measuring, include every turn and change of direction, and add approximately 10% extra to account for corners, cuts, and potential mistakes. If your strip won’t cross large gaps like doorways, subtract those from your total length. Plan your wiring and fixing points to ensure the strip stays securely in place along the entire route.
Before purchasing materials, sketch your planned route on paper. Map out obstacles, bends, and points where the strip will change direction. Mark the route carefully to visualize the actual installation. Confirm that your plan achieves the desired effect, such as a seamless glow along the perimeter or specific accent points. Proper route planning ensures you buy the correct length and avoid waste or shortage during installation. For a similar lighting upgrade approach, consider how top rope with lights products are reviewed for quality and performance. To achieve a truly cozy ambiance, review the best string lights for bedroom settings to compare different lighting styles.

【Creating a perfect atmosphere】LED light strips come in 16 million colors and 22 dynamic scene modes, allowing you to explore your favorite or most suitable for your mood, bringing yourself a truly dreamy lighting experience

Ultra Long LED Strip Lights: The 200ft led light strip comes with 2 rolls of 100 feet ; It’s Long enough to decorate the entire room; Led lights for room decor is suitable for bedrooms, kitchens, stairs, dining rooms, ceilings, and large party areas.

Bright led strip lights: Our 50 ft(2 Rolls of 25 ft)white led strip with 900 LEDs and 6500 K color temperature, easily light up those dark rooms, cabinets, mirrors and corners. (Note: Two rolls of 25 ft led white strips connected together to a single controller)
Clean the Surface and Get the Right Mounting Gear
Surface preparation is crucial to ensure ceiling LED strips stay securely attached. Start by thoroughly cleaning the surface to remove all dust and debris using a dry microfiber cloth. Next, wipe along the installation path with a lint-free cloth dampened with 70% isopropyl alcohol, then allow it to dry completely. Moisture left behind can weaken the adhesive bond. For glossy or slick ceilings, lightly sanding the surface with 1200-grit sandpaper can significantly improve adhesion. After sanding, wipe the area again with alcohol to remove any dust. Do not rely solely on the strip’s backing tape; supplement your installation with additional mounting methods such as clips or aluminum channels. Screw-in spring clips are effective for securing channels to drywall, while adhesive alone may not hold on textured or non-porous surfaces. Choosing the right mounting hardware based on your ceiling’s texture and the weight of the LED strips will ensure a firm, long-lasting hold. For lighting setups requiring consistent illumination, a quality ring light with a stable stand can provide similar reliability for photography and video work. Proper surface prep and sturdy mounting options are key to preventing your LED strips from loosening or falling. This approach mirrors the safe reuse principles for foil balloons, where cleaning and proper gear ensure reliable performance. For a clean, permanent result, consider opting for aluminum channels as a reliable mounting gear alternative to adhesive tape.
Wire the Power Supply Safely Before Mounting
Before mounting the LED strips, it’s crucial to wire the power supply safely. Start by disconnecting power at the breaker—never skip this step to prevent electrical shock. Match your constant-voltage driver to the strip’s DC voltage; avoid connecting directly to AC to ensure safety and proper operation. Calculate the total wattage of your setup and choose a power supply with at least 20% spare capacity, aiming to load it at no more than 80% to prevent overheating. For attaching a ring light or other accessory, consider using a tripod with ring light to ensure stable positioning and even illumination.
Pay close attention to wiring polarity: connect positive to positive and negative to negative on both the strip and driver. Reversed polarity can cause flickering or damage. Use soldering or certified connectors to make secure, insulated connections. Select stranded copper wire with enough thickness—typically 18 to 22 AWG for most LED applications—and keep wiring runs as short as possible to minimize voltage drop. Mount the driver with at least 5 inches of clearance to ensure proper ventilation, and position it away from heat sources such as lighting fixtures or heaters. Keep AC and DC wiring separate to prevent interference and potential hazards. Finally, install a fuse rated slightly above your total current draw to provide an extra layer of electrical protection. For surface-friendly mounting of the strips, consider using adhesive hooks or clips that hold securely without damaging the ceiling. A similar principle of using lightweight, non-damaging supports applies when creating a balloon arch without a stand, where you rely on existing anchor points rather than heavy hardware.

Prewired with a 60 in. removal AC cord with plug for use in a standard 120-volt AC outlet

Input: AC 100 - 240V, 50 / 60Hz ; Output: DC 24V, Max 5A, 120W ; It can supply with all amperage less than 5A. ---such as 500mA, 800mA, 1A, 2.5A, 5A. If your device draws 3A then 3A will be supplied. But if draws more than 5A, only 5A will be supplied and power supply will be damaged soon. NEVER OVERLOAD!
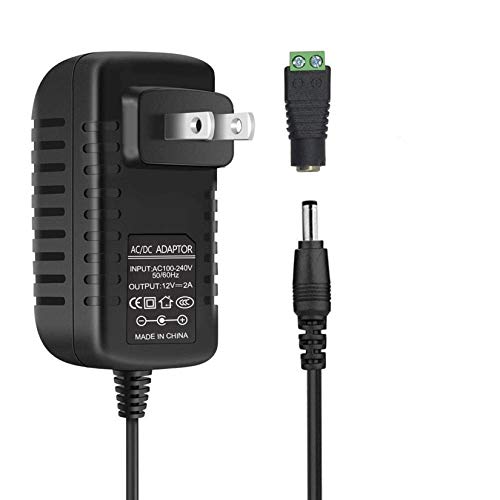
[INPUT&OUTPUT] 12V 2A power supply, 100-240V AC input, 50/60Hz, DC 12V 2A output, 24 Watt (24W) maximum power output
Mount the LED Strip Section by Section in a Straight Line
To mount the LED strip section by section in a straight line, start near the power-entry point. Peel only a short portion of the backing at a time and press each segment firmly along your pencil line before exposing more adhesive. Keep the strip aligned with your reference mark, advancing in small increments to prevent stretching or damaging the internal circuitry. As you go, smooth each section immediately to avoid bubbles or twists. To prevent sagging overhead, reinforce the run with mounting clips every 12 to 18 inches. Use screw-fastened clips if your ceiling is textured—adhesive alone may not hold securely. For choosing the best outdoor-rated option, consider top umbrella lights designed to withstand weather and provide even illumination. This careful, step-by-step method ensures your decorative patterns stay crisp, and the light distribution mimics natural lighting without creating uneven shadows. Before moving on to the next section, double-check that each part is straight and fully in contact with the surface.

LED Strip Light Mounting Brackets with two fixing methods:adhesive and iron screws,suitable for any scene you want .check up your led strip light size (width need<10.5mm and height need<2.8mm ) before buy these led brackets

4 MM hollow height,suitable for 10 MM Wide LED SMD 3528/3014/5050/5630 Waterproof Strip Lights' and Wires'( thicker than 1/6") installation

TRANSPARENT COLOR</b>.The clear clips could be hidden in plain sight.
Cut and Bend LED Strips Safely at Corners
To cut and bend LED strips safely at corners, follow these guidelines to prevent damage and ensure a neat installation. First, always mark the designated cut points, which are typically indicated by copper pads along the strip. Use sharp scissors at these marks to make clean cuts, taking care to avoid damaging the copper pads underneath. If your LED strip is waterproof, remove the silicone coating from these pads before reconnecting to ensure proper electrical contact. Notably, tablecloths were first used in ancient Rome to protect tables from spills, a concept that parallels protective measures for your electronics. A neat finish can also be achieved by securing the fabric or tubing smoothly, much like how a drape would be pinned. Before making any cuts, confirm that your strip is rated for cutting at the marked intervals, as improper slicing outside these zones can ruin the circuit.
When bending the strip around corners, avoid sharp horizontal folds or 90-degree bends that can damage the circuitry. Instead, use corner connectors designed to fit your strip’s width and pin configuration, making sure to align the polarity correctly to prevent malfunction. Alternatively, you can bend in a 90-degree pinch without damaging the strip if you secure it with super glue. For added flexibility and durability, solder short wire jumpers between sections; this reduces mechanical stress and simplifies connections, especially when creating intricate layouts or turning corners. Always solder at a safe temperature to prevent melting the strip’s backing.
Always test each corner connection before permanently fixing the strip in place. Gently tug on the connections to verify they are secure. Keep the power turned off during cutting and wiring to avoid shorts, and verify full illumination once connected to ensure everything functions properly. Before affixing the strip permanently, double-check all connectors and pads for proper alignment to prevent issues later on.
Test All Modes and Check for Heat or Loose Spots
After completing your cutting, bending, and securely connecting the LED strips at the corners, you should immediately test all modes before final mounting. Run through every color, brightness level, and pattern to verify that the controller functions correctly and that the sequences change smoothly. Watch closely for any dropouts, stutters, or delayed responses, as these indicate connection or compatibility issues.
Check that the lighting is even across all sections. Partial responses or uneven illumination suggest a faulty segment or poor connection. It’s important to identify these issues early to prevent larger problems later. Proper wiring or fixing points must be evaluated now, before the strip is permanently adhered, to ensure the layout supports stable power delivery.
Next, evaluate the thermal performance. Some warmth during operation is normal, but if any area becomes excessively hot, it might signal overcurrent, inadequate ventilation, or a short circuit. Inspect LEDs for discoloration, and look for melted connectors or hot spots. If the strip feels very hot, temporarily reduce the brightness to lower the heat and prevent damage. Avoid installing strips in enclosed spaces without proper aluminum profiles or ventilation to facilitate heat dissipation. Similar to a ring bearer pillow, the mounting surface should be cushioned and secure to prevent slippage or damage to the strip. Understanding the typical lifespan of your strip lights helps you anticipate when to replace them and avoid unexpected failures.
Finally, examine every connector, joint, and termination point. Reseat any loose connectors, which can cause flickering or intermittent functionality. Perform a full-power test by running the strip at maximum brightness and load for several minutes. If you notice erratic voltage or flickering, measure the supply voltage to ensure stability. A clean finished look depends on verifying that all terminations are tight and concealed properly before finalizing the install. Do not close up or conceal the installation until no section feels overly warm after extended operation, confirming the heat is managed and the setup is safe.